2010年12月30日星期四

RIM: PlayBook Battery Life Will Be “Comparable,” Not Crappy

Research in Motion’s BlackBerry PlayBook does not suffer from poor battery life. Or, rather, if it does now it won’t when it finally ships.

That’s RIM’s rebuttal to Kaufman Bros. analyst Shaw Wu’s suggestion that the PlayBook’s battery life is “relatively poor” compared to rivals–a claim the company says is based on the observation of a pre-beta version of the device.

“Any testing of battery life to date by anyone outside of RIM would have been performed using pre-beta units that were built without power management implemented,” RIM said in a statement. “RIM is on track with its schedule to optimize the BlackBerry PlayBook’s battery life and looks forward to providing customers with a professional grade tablet that offers superior performance with comparable battery life.”

Ah, but comparable to what? And speaking of “comparable,” what happened to “way ahead”? Wasn’t that what RIM co-CEO Jim Balsillie said of the PlayBook’s performance during the company’s last earnings call? “I think there’s going to be a rapid desire for high performance. And I think we’re way ahead on that. And I think CIO friendliness, we’re way ahead on that.”

And what does RIM have to say about Wu’s suggestion that it may be forced to delay the PlayBook’s launch to optimize its battery life? Nothing beyond the oblique assertion that it’s on track with an undisclosed internal schedule. Question is, is that schedule still based on an early 2011 launch or one in the May quarter as Wu suggested. Because if it’s the latter, that means the PlayBook could conceivably arrive at market after the next-generation iPad.

2010年12月29日星期三

ITunes Video Rentals a $1 Billion Business by 2015?

How big is Apple’s iTunes video rental business? In a research note today, Gleacher & Co. analyst Brian Marshall hazards a guess: Apple’s serving about 475,000 rentals a day and raking in upward of $60 million per quarter doing it.

Not too shabby for a service launched in January of 2008. And if its growth follows a trend line similar to that of Netflix–which is certainly within the realm of possibility given sales of next-generation Apple TVs and the popularity of iOS devices like the iPhone and iPad–Marshall figures Apple’s iTunes rental operation will be big business by 2015.

“Over the past five years, Netflix’s subscriber base has quintupled while revenue more than tripled,” says Marshall. “If Apple can grow its related business similarly to Netflix’s historical growth profile, it is feasible iTunes’ annual rental revenue could exceed $1 billion by 2015.”

That’s another $300 million per year for Apple’s bottom line, assuming the company keeps about 30 percent of the total.

2010年12月28日星期二

Analyst: IPad Rules Holidays; Rivals Are “Not Ready for Prime Time” Players

Hardly surprising. This holiday season the iPad was pretty much the go-to device for consumers looking to gift a tablet. In a note to clients this week, Wedge Partners analyst Brian Blair said recent retail checks point to significant end demand for the iPad.

“Even with a handful of tablet competitors hitting the market, the iPad remained the only game in town in our holiday checks largely because many of the tablets hitting the market are junk for lack of a better word,” he wrote. “They are underpowered, poorly constructed and largely not ready for prime time.”

Evidently, Blair wasn’t too impressed by Samsung’s Galaxy Tab.

Anyway…

The holiday season is always particularly kind to Apple, but this year it may have been even kinder than usual. In addition to the iPad’s continued momentum at market, Blair observed stronger than expected holiday sales of iMacs, MacBook Pros and the new 11-inch MacBook Air.

Sounds like Apple’s December quarter is shaping up to be another blowout.

2010年12月27日星期一

How to Convert MPEG to iPod

Everybody knows that not all video files can be played on iPod, sometimes, so many video files can't be played on your iPod. At this time, you maybe so morose and frustrated. Don’t worry, Aiseesoft iPod Movie Converter can help you to convert almost video formats to iPod video, especially the conversion from MPEG to iPod, once you own the powerful MPEG to iPod Video Converter.

The following tips will guide you how to step by step convert MPEG to iPod with Aiseesoft powerful MPEG to iPod video converter software.

1. Free download the useful and easy-to-operate MPEG to iPod Video Converter, install and launch.

2. Add the MPEG video files from the "File" menu or click “Add File” button.

3. Choose the proper output folder and the profile "iPod" format.

4. Click "Start" button! After a few minutes waiting, you can play the converted MPEG files on iPod.

2010年12月25日星期六

Some problems the new iPod touch users may meet

1. How to change iTunes to recognize the new iPod touch
Some New iPod users may meet the situation that your iTunes can not detect your new iPod nano, iPod touch, or iPod Classic. It should recognize it immediately. If it doesn't, download the latest version of iTunes. The problem will be solved:
1) Re-launch iTunes, with and without your iPod plugged in.
2) With iTunes open, reset your iPod Touch
(here:http://docs.info.apple.com/article.html?artnum=305743 ) Press and hold the Sleep/Wake button and the Home button at the same time for at least ten seconds until the Apple logo appears.
3) Restart your computer leaving your iPod touch plugged in
Note: If you uninstall iTunes from a computer, it will be uninstalled for all the users. But it will show up again for all users once you re-install it again. Before uninstalling each user should backup his/her playlists so they can bring them back when the re-install is completed.No music for any of the users will be removed by iTunes. It will remain intact where it is saved.

2.'I can't turn on my iPod'
I have a 1st or 2nd generation video iPod (80 gig).
My computer is windows 2000 so I downloaded the windows 2000 iTunes. So I decided to update my iPod, it was updated and it was fine. It ran out of power. Then it won't turn on? I tried to charge it but it just keeps saying please wait such and such. I left it there for like 2 hours already, and still it didn't charge up... Is the problem because I updated my iPod or something else? And when I opened my computer, iTunes asked me if I can format my iPod into windows. I put yes, it didnt do anything.So I have to problems, its not charging.. and its not turning on.
by Ashley :'My friend had this same problem a few years ago.She just left it plugged in to her computer for a few days, waited it out... eventually the problem fixed itself on its own. I'd say just wait it out for a day or two, and if it's still having problems, take it in to your nearest Circuit City or something.”
by Karat :'its the most popular iPod problem. If you drain the battery fully, you're screwed. Basically the battery is down, but the darn thing wont charge unless you connect it to the usb and the usb wont detect it unless it has charge! So please take it to your nearest apple outlet.”
by Kylla :'The one thing you never want to do with an iPod is let it run out of power, not good for it at all :P I've done it a few times but try to avoid it. What you want to do is hold the menu button and the play/pause button at the SAME time and just wait for it. It should restart it. Thats how my iPod works, yours could be different so experiment with the buttons. Try holding perhaps the center button and the play/pause button? or center button and the menu button? Try to see which two buttons will restart it, its bound to work. But hold BOTH of them down at the SAME time with one hand..and be patient, wait for about 10-15 seconds or so. :)”

3. Why does my 30G iPod video always die quickly?
Even when I am just listening to music. It shuts off after about 45 min. And that is a problem because I am going on a plane trip soon and I plan to watch a movie on my iPod, but movies eat your batttery. Does this happen to anyone else???? How can I make the battery life last longer. btw, it is only like a year old.
by dipin :'In an iPod the battery life is different.
it doesnt depend on how old it is rather it depends on how many times you have charged and discharged it.
for increasing the battery life you should fully charge the battery every time you are charging it . and secondly you should never let it discharge completely . put it on charging just before it shows the red signal and disconnect it only when it is fully charged.
sorry to say but now u'll have to get the battery replaced from apple reseller if you want to watch complete movie the battery life as said by apple is 500 complete cycles of charging and discharging”
by sugadoll :'The same thing happened to me. The problem is that your computer can't detect a completly dead iPod, but you need the computer to charge it so your screwed. j/k I solved it by pluging it into my ihome dock that plugs into the wall. So if you have a wall iPod dock or a car one you can charge it enough so that the computer can detect it. Problem solved.

Recommended Products For you:
DVD Ripper for Mac
Convert DVD to any video or audio formats on Mac OS X. Aiseesoft DVD Ripper for Mac is a professional Mac DVD ripper software.
Video Converter for Mac
Convert all video formats from one to another on Mac OS X. Aiseesoft Video Converter for Mac is a specially designed Mac video converter.

2010年12月24日星期五

Top 5 Best iPod Video Converter Review

There is hundreds of iPod software available now. After the wide investment, for you to manage your iPod efficiently, we made this iPod Video Converter Review for the best iPod Video Converters. It includes iPod Nano Converter, 3gp converter iPod, etc. So it is also the video converter review.

1. 4Videosoft iPod Video Converter
Free Download  $29.95
This iPod video converter can assist you convert MP4, MPG, MPEG, MOV, M4V, RM, WMV, ASF, MKV, 3GP, MOD, TOD, etc, even the YouTube FLV video to your iPod video or audio supporting formats.
More features:
* So cool and friendly user-interface for you to easily and quickly operate.
* Support all video and audio sources.
* More helpful editing functions for you to create your own video.
* Excellent and timely support email services.
* Free upload for life included.
* Customize output settings.

Any of the five iPod software is good. They all have the excellent features to meet your needs.

2. Aiseesoft iPod Movie Converter
Free Download  $29.00
This iPod software is designed for Windows iPod users. Convert all video and audio formats to iPod MP4, H.264, MP3, AAC, M4A.
More features:
* Easy, simple and quick installation and operation.
* Accept MPG, MPEG, MPEG2, VOB, MP4, M4V, RM, RMVB, WMV, ASF, MKV, TS, MPV, AVI, 3GP, 3G2, FLV, MPV, MOD, TOD.
* High-quality of converted video and audio.
* More editing functions: Trim, Crop, Merge into one file, Take snapshot.
* Free and life-long upgrade.
* 7*24 online email support.

3. Tipard iPod Video Converter
Free Download  $19.00
This is another best iPod Video Converter for Windows user to convert any video and audio sources to iPod MP4, H.264, MP3, AAC, M4A.
More features:
* Fully support Windows NT4/2000/2003/XP and Windows Vista, Windows 7 Hardware.
* Support batch conversion.
* Allow preview during the whole process.
* You decide the video size via adjusting the specific parameters of output file.
* Convert 3GP, FLV to iPod easily.
* The output quality is excellent.
* Life-long upgrade.

Best iPod Video Converter

4. Aiseesoft iPod Video Converter for Mac
Free Download (Intel, Power PC)  $29.00
This iPod software is the best iPod video converter for iPod Mac users to convert any video and audio formats to iPod MP4, H.264, MP3, AAC, M4A.
More features:
* Possessed with friendly user-interface.
* One of the quickest software available.
* Preview available during the whole process.
* Capture any time-length clips from source video.
* Adjust the aspect ratio.
* Pre-set the specific parameters for output format.
* Capture your favorite pictures.
* Supported formats: MPG, MPEG, MPEG2, VOB, MP4, M4V, RM, RMVB, WMV, ASF, MKV, TS, MPV, AVI, 3GP, 3G2, FLV, MPV, MOD, TOD, AAC, AC3, WAV, MID, WMA, M4A, RA, RAM.

5. Tipard iPod Video Converter for Mac
Free Download (Intel, Power PC)  $29.00
This best iPod video converter is another iPod software for iPod Mac users. Convert MPG, MPEG, MPEG2, VOB, MP4, M4V, RM, RMVB, WMV, ASF, MKV, TS, MPV, AVI, 3GP, 3G2, FLV, MPV, MOD, TOD, Youtube to iPod MP4, H.264 video formats and MP3, AAC, M4A audio formats.
System Requirement:
Processor: PowerPC® G4/G5 or Intel® processor
OS Supported: Mac OS X v10.4 - 10.5
Hardware Requirements: 512MB RAM, Super VGA (800×600) resolution, 16-bit graphics card or higher
More features:
* Works with all video sources.
* Has pre-defined settings for you to get the high or standard output quality.
* Create your own customized video under the useful editing functions of trim, crop, join.
* Total preview for the whole process.
* 7*24 email support.

Best iPod Video Converter for Mac

Hope the best iPod Video Converter, iPod Video Converter for Mac software would help you, and make your digital media life colorful.

2010年12月22日星期三

How to use Mac The Ripper to rip DVD to iPod, iPhone, etc. on Mac

Part 1. Use MacTheRipper to minus the copy protections for free
Mac The Ripper is a free DVD ripper (extractor) for Mac OS X. It can extract commercial DVD movies to your hard drive, minus all the copy protections and region controls put in place by DVD publishers. Mac The Ripper removes CSS encryption, Macrovision protection, and sets the disc's region code to '0' for region-free by default, and is capable of removing RCE region protection as well, making an unrestricted copy of any DVD movie you own. It doesn't rely on the DVD drive to get the CSS decryption keys, so that means that you do not need to play the DVD with DVD Player in order to rip it to your hard drive unprotected. MacThe Ripper is also capable of removing UOPs, or User Operation Prohibitions, which are the settings that prevent you from skipping or fast-forwarding certain parts of DVDs, such as FBI warnings, previews, logos, intros, etc. Mac The Ripper is also able to extract discs with the new ARccOS protection, as well as DVDs that have been damaged or improperly mastered.
WARNING: Disabling UOPs can break the navigation on certain DVDs. If you disable UOPs, be sure to verify the DVD with DVD Player before you burn it to DVD±R disc.

Step 1. install MacThe Ripper
Download it from: http://www.Mactheripper.org. To install Mac The Ripper, simply mount the .dmg archive by double-clicking it, and copy the Mac The Ripper application from it to your Applications folder (or wherever you want it ), along with this Mac The Ripper Manual if you need it.
Step 2. convert DVD for free
To use Mac The Ripper, you should insert your DVD movie into your DVD drive and launch the Mac The Ripper application. Then, you should set the RCE options if applicable. If Mac The Ripper displays 'DISC RCE: -CLEAR-' after scanning the DVD in the drive, you can leave the 'RCE Region' popup menu on 'OFF', as it is by default. Only (and always) set the 'RCE Region' to 'OFF' when it says that RCE is '-CLEAR-'.
Once you've selected the type of extraction and options you want, you can go back to the 'Disc' tab and click the 'GO!' button (or hit the 'Enter' or 'Return' key) to start the extraction.

Mac The Ripper
Mac The Ripper - dvd extraction

Step 3, finish extract movie from DVD.

Mac The Ripper - extract movie from DVD

You can find a folder in the save location. The output files extracted by MacTheRipper are saved as .VOB format .
Tip: RCE region protection
region 1: North America; U.S. territories; Bermuda
region 2: Europe; Western Asia; Kingdom of the Netherlands; Egypt, Japan, Lesotho, South Africa, Swaziland; British overseas territories, French overseas territories; Greenland.
region 3: East and Southeast Asia
region 4: Oceania; Central and South America; Caribbean; Mexico
region 5: Africa, Central and South Asia, Belarus, India, Mongolia, North Korea, Russia, Ukraine
region 6: Mainland China

Part 2. Convert the .VOB files to other video, audio formats compatible with iPod, PSP
After using Mac The Ripper to minus the copy protections, we can use Aiseesoft Video Converter for Mac to convert .VOB files to formats that compatible with popular players such as iPod, iPhone(iPhone 3G), Apple TV, PSP, Zune, etc.
Step 1:
Download and install Aiseesoft Video Converter for Mac
Note: If you just want to convert .vob file for iPod, You can choose this powerful iPod video converter for Mac. It can convert .VOB file to iPod video and iPod audio on Mac OS with powerful functions and fast converting speed!
Step 2:
Run Aiseesoft Video Converter for Mac, click 'Add File' button to import the .VOB files, choose the output format, then click 'Start' to start the conversion. If you want to put the video on PowerPoint, you can choose .avi as output format.
Tip: Aiseesoft DVD Ripper for Mac can rip DVD to all popular video and audio formats directly. It can rip DVD to videos including MP4, AVI, MOV, M4V, 3GP, MPG, MPEG, FLV, etc and can convert DVD audio to MP3, M4A, AAC, AC3, etc. It is more easy to use than Mac the ripper. You can download it for free and have a try.
Step 3:
After the conversion is finished, You can transfer the converted files to the players. For example, use iTunes to transfer the mp4 video to your iPod, here are the steps:
1. Open iTunes and click "File" to add your converted videos to iTunes library.
2. Plug in your iPod to computer, then iTunes will detect your iPod as a device.
3. Select your iPod device on the left panel of iTunes, click "Movies" tab, check the videos you want to sync and click "Apply", done.
Recommend: DVD Converter Suite for Mac: all-in-one solution to convert DVD and Video to MP4, AVI, FLV, MOV, MKV, ASF, directly for your iPhone, iPod, PSP, iPod touch, Zune, etc. on Mac OS X.

2010年12月19日星期日

Google TV Going MIA At CES?

Conventional wisdom on Google TV: Not ready for prime time. Google apparently agrees: It has asked Toshiba, LG and Sharp not to show off their versions of the Web/TV platform at the Consumer Electronics Show next month, the New York Times reports. But Samsung will display a new Google TV set on the show floor. And if you ask nicely, Vizio will show you one in private. Here’s Walt Mossberg’s November 17 review – “No Need to Tune In Just Yet“.

2010年12月17日星期五

Careful Where You Click! Google Flags Hacked Sites.

Gawkergate got you feeling itchy about the sites you visit? Perhaps Google can help: The search engine is now telling searchers when it thinks a site may be hacked. Or in Google’s words, it tells you, “This site may be compromised.”

Here’s a sample, from Google’s blog post announcing the change (via SearchEngineLand). Click on the image to enlarge:

Google has already been flagging sites it thinks are distributing malware, so this is just an incremental step. And Google apparently thinks a “compromised” site is less dangerous than one it thinks “may harm your computer”: If you click on the link for the latter, Google will send you to an “are you really sure you want to go there?” message, but Google won’t actually slow you down if you want to head to a hacked site.

2010年12月16日星期四

“Fast Five” Trailer Debuts on Vin Diesel’s Facebook Fan Page

There are certainly a lot of movie trailers on the Web, but this one made its first appearance on the Facebook fan page of its meaty star.

That would be action star Vin Diesel, who is the star of the “Fast and Furious” car thief series and has–no, really, including BoomTown–20 million fans on the social networking site. Obviously, that’s why the promo for the latest sequel, “Fast Five,” made its debut there.

2010年12月14日星期二

How to backup DVD movies to DVD for free

This is a tutorial that explains the process of backing up a DVD on a PC using DVD Shrink. While there are many software solutions for backing up DVDs, the one on Windows I like is DVD Shrink. On Mac OS X, I like this DVD Copy for Mac.

that can copy DVD movie (D9 to D9, D5 to D5) with the entire movie in 1:1 ratio perfectly. This tutorial will be a concise explanation of how to backup DVD movie to DVD for free. There are many reasons to make a backup copy of DVDs one has purchased, keep reading to learn how to improve the quality of your re-encoded backups.

Step 1, download DVD Shrink
You can download DVD Shrink from: http://www.DVDshrink.org/.
For Mac users, you can download the DVD copy for Mac from here.

Step 2, Run DVD Shrink and insert your DVD movie into the DVD drive
The first thing you will need to do is open the disc. Click on "Open Disk" at the top-left of the program window. A small window will pop up. There is a drop down menu - select the drive and disk that you are going to backup. Then click OK. When you click OK, the DVD will be “analyzed”–this process will last for 1-3 minutes, then DVD Shrink will “suggest” a level of compression.

back up DVD - insert DVD movie

If you receive an error while trying to rip the DVD (like the one shown in the screenshot above), you will need to use another program such as DVD Decrypter to copy the DVD files off of the disc on to your hard drive. You need to minus the copy protections first. Click here to read how to use DVD decypher to minus the copy protections of DVD.

DVD decypher

Step 3. Adjust compression for individual Titles (optional).
DVD Shrink will automatically select the highest possible quality settings that will fit on your disc. You could accept the settings that DVD Shrink chooses. You can also increase the quality of the main movie file by reducing or eliminating other video and audio files on the DVD.
Many modern DVDs will contain bonus footage, trailers, multiple surround sound modes, and other settings that one can reduce or eliminate to improve the quality of the main movie feature.
The main movie quality setting is reported to the left of a slider bar in the top right of the screen. In the screenshot below we see that the default setting requires that the main movie be compressed to 48.2% of its original level to fit on the disc. You can increase this percentage to improve the final quality of the backed-up DVD. But the output file will be larger.

backup DVD Movie - setting

The way in which one goes about improving the quality of the main movie will be different depending on your specific needs. For example, when “Dolby Digital” and “DTS” 5.1 audio tracks are available, you can remove “DTS” (to save hundreds of megabytes), you can also choose to preserve “DTS” and reduce or eliminate other items from the DVD.
Some of the settings I made to this particular DVD were:
--Removed “5.1-ch French” audio track (went from 48.2% to 55.4% compression for main movie).
--Replaced certain Titles with “Still Image” (keep reading for more on this).
To improve the quality of the main movie, you'll need to reduce or eliminate other DVD features, each called a “Title” in DVD Shrink. Click the “plus sign” next to “Extras” in the menu to view the other titles.

DVD Shrink

The Title I've selected below was 72MB. In this case the video was a “behind the scenes” feature that I did not wish to keep. Since one cannot completely remove any of the “Titles,” the next best thing is to replace them with a still image. In order to do this, select the title you want to replace, and choose “Still Image” from the drop-down menu in the top right. In this case the file went from 72MB to 66MB. The still image is configurable, simply drop an image of your own into the aptly named Still Images directory found under Program Files > DVD Shrink.

Step 4, Burn the re-encoded files to disc.

burn file

Click “Backup DVD” and Now select the folder where your temporary files will be saved. DVD Shrink needs to save a bunch of files on your computer (that actually compose your movie) so that it can burn that movie back onto another DVD. This is why you had to clear 5 gigs of space on your hard drive. Once the DVD backup has been burned, you can go ahead and delete these temporary files (the program does not do this itself).
You may as well select “Region Free” (default) under the DVD Region tab.
on the Burn Settings tab make sure “Maximum” burn speed is selected in the drop-down menu.
Once you have the settings the way you like them, begin the burn process. You'll see the “Encoding” happening first. There is a video preview that will show you where you are, but I believe that the encoding process goes slower with this setting enabled.

burn DVD movie - Encoding

Once the files have been copied to your hard drive, your original DVD movie will eject from your computer.
You will also have a pop up asking you to put a blank DVD into the DVD burning drive of your computer that you previously selected.
Exchange the original DVD movie for a blank, burnable DVD. Push the blank DVD into the drive. DVD Shrink will begin burning the new DVD automatically in a few seconds. Now you will get a pop up that shows the progress while the program burns your new DVD movie. Once the new DVD has been burned, you will get a window that tells you that it's done. Click OK, close the program, and take your new DVD movie backup. All Done!

Note: DVD Shrink is only for PC users. If you are a Mac user, Please download DVD copy for Mac .

2010年12月13日星期一

How to put DVD movie into Windows Movie Maker and iMovie

If you want to edit a DVD movie with Windows Movie Maker or import several DVD clips into Mac iMovie to build a new DVD, but you get frustrated with the DVD format, this guide may help you solve the problem.

Before you get started, it will be helpful if you learn something about the DVD, WMM and iMovie.
General DVDs have CSS copy protection in MPEG-2 or VOB format.
(Windows) Windows Movie Maker supports WMV, AVI and MPG video files.
(Mac) iMovie accepts MOV and MPEG4 video files.

This guide includes two parts:
1. How to put DVD movie into Windows Movie Maker.
2. How to add DVD clips to Apple Mac iMovie .

Part1. How to put DVD movie into Windows Movie Maker

Step1. To put a DVD movie into Windows Movie Maker, you have to rip your DVD to WMV or AVI video first, and then you can load it into Windows Movie Maker. I’d prefer using Aiseesoft DVD Ripper to do this. You can get this program at: http://www.aiseesoft.com/dvd-ripper.html Then install and run it, put your DVD disc into your DVD drive, click “Load DVD” to locate your DVD file and import it, or load it by clicking “Load IFO File” to add DVD IFO file. (This DVD Ripper can rip copyright protected DVD movies, but you should remember that it’s illegal rip DVD for any business purposes)

Rip DVD with DVD Ripper for WMV

Step2. Select output format and subtitle

After you load the DVD files, click the format drop-down list to select “WMV – Windows Media Video (*.wmv)” or “AVI – Audio Video Interleaved (*.avi)” as the output format. A regular DVD movie has multiple subtitles and audio tracks, and you can select the right one for you. If you just want a certain part of the DVD movie, you can click “trim” to cut the DVD movie. Just drag the timeline bar to set the start and end time, and then blue line will be the captured parts.

Rip DVD into Windows Movie Maker

For advanced user, if you want to output higher quality video, click the “Settings” button to open the panel, here you can customize video bitrate, audio bitrate, resolution, framerate, etc. Higher bitrate will result in bigger file size.

Step 3. Start to convert

After the above steps, you just need to click “Start” and wait for the conversion to be finished. It provides the fastest conversion speed (>300%), completely support dual core CPU.

Step 4. Edit DVD with Windows Movie Maker (optional)

Run Windows Movie Maker, in the “Movie Task” bar, click “Add Video” to browse your computer and located the converted files, and then you can start to make personal movies.

Edit DVD with Windows Movie Maker

Tips:Many users may wonder how they can convert Windows Movie Maker file (*.MSWMM) to other video format. Actually, A *.MSWMM file is not a video file. It is a project file of Movie Maker (more like a record file). You have to open this file in Windows Movie Maker and save the movie to your computer: Go to Movie Tasks bar > Finish Movie > Save to my computer. After that you will have a WMV file which can be converted to another video format or burned to DVD.

Part2. How to add DVD clips into Apple iMovie.

iMovie is similar to Windows Movie Maker, it supports MOV and MP4 video, so you just need to convert your DVD movie to the right format. Aiseesoft DVD Ripper has a Mac Version which supports both Mac OS Tiger and Leopard; you can download it for free from here: http://www.aiseesoft.com/dvd-ripper-for-mac.html
It is easy to use for the operation steps being similar to the windows version.

put DVD into Apple iMovie

When the conversion is finished, you can run the iMovie, build a new project, and then drag the converted files to the work space to make personal files.
When the task is finished, In the Menu bar, Click "File" -> "Export" and save it as QuickTime video.

put DVD into Apple iMovie

Download Aiseesoft DVD Ripper for Windows (put DVD into Windows Movie Maker)
Download Aiseesoft DVD Ripper for Mac (put DVD into Apple iMovie)

2010年12月12日星期日

The iPod Family(Part 1)

We're hard pressed to say the iPod family's fallen on particularly hard times, but being under such excruciating public scrutiny can take its toll on any dynasty; especially in a year like 2005, the family shaken to its core by so many tragic deaths. From the humble beginnings of the iPod that began the legacy so many years back, all the way up to the tragic loss of the iPod mini just yesterday, we felt it might be time to take a visit to the iPod family cemetary on this early autumn afternoon.

iPod Family
iPod family Tree

2001

first generation iPod
The first generation iPod-October 2001 - July 2002

2002
second generation iPod
The second generation iPod-July 2002 - April 2003
But a few mournful months after the passing of the 5GB iPod and the birth of the 10GB iPod, came a new 10GB iPod and the 20GB, which started at $499. Perhaps one of the least well-remembered of the iPod family, this iPod included the first non-mechanical (solid state) scroll wheel, though the center and circumference buttons remained tactile. Perhaps most groundbreaking was the official Windows support (via Musicmatch Jukebox, ironically), though the wired remote, calendar, and artist search were all significant as well. Eventually this iPod would undergo tattoos by Beck, No Doubt, Madonna, and Tony Hawk before being committed to history in April of 2003.

2003
third generation iPod
The third generation iPod-April 2003 - July 2004
This was the iPod—born of humbler pedigree—that grew up, provided for itself a higher education, and made its own way in the world. The third generation of the family rid itself entirely of mechanical buttons on its body, shed some of its baby fat around the waist down to 4.1 x 2.4 x 0.62-inches, and came forth at $299 for 10GB, $399 for 15GB, and $499 for 30GB. This was also the first iPod child to feature a remote connector and dock connector—which finally enabled USB 2.0. In September the 30GB iPod was priced at $399, and a 40GB model was released for $499.

Related theme:
The iPod family(part 2)
The iPod family(part 3)
The iPod family(part 4)
The iPod family(part 5)

Recommended Products For you:
DVD to iPod Converter for Mac
It's a specially designed iPod conversion program to Convert DVD to iPod touch, iPod classic, iPod nano, convert DVD to iTunes on Leopard.
iPod Video Converter for Mac
It can convert MP4, MOV, 3GP, AVI, RM, MPEG, ASF and FLV to iPod video with high output quality and various features .

2010年12月11日星期六

Silicon Valley Comes to Cambridge

Here’s a video of one of tech’s best-known entrepreneurs, Reid Hoffman, speaking at the U.K.’s Cambridge University during an annual pilgrimage made by a group of Silicon Valley players.

There are several other speeches from others on the site at Silicon Valley Comes to Cambridge, which BoomTown did a few years ago too.

2010年12月9日星期四

Infinity Blade Makes Your Favorite iPad Game Look Like Donkey Kong

Infinity Blade, the iOS game with which Epic Games wowed the audience at Apple’s September music event, launched on iTunes this morning, raising the bar for iOS games to a dizzying height.

The first RPG to make use of the Unreal game engine, Infinity Blade takes the iOS platform closer to the console gaming experience than any other game I’ve seen. Combat is engaging, despite the constraints of touch-based gaming, and the graphics and textures are impressive enough to drop your jaw–even if you’re already familiar with Infinity Blade’s precursor Epic Citadel, an app designed to do nothing more than show off a beautifully Unreal Engine-rendered 3-D castle. Infinity Blade makes Hero of Sparta look like Donkey Kong and shows off what’s possible when you push iOS and the hardware on which it runs to the limits.

Earlier this year, Nintendo of America President Reggie Fils-Aime said he thought the greatest competitive threat to Nintendo’s gaming business came out of Cupertino. “Do I think that in the near term [Apple] can hurt us more than Microsoft?” he said. “Absolutely.”

Infinity Blade is just one more reason to agree with him.

2010年12月8日星期三

When Marc Met Mike–Andreessen Interviews Ovitz

There is no question that legendary entrepreneur Marc Andreessen is a power player in Silicon Valley.

Nor that Michael Ovitz, who used to be the power player in Hollywood, is one of the people who did most to disrupt the way business was done in the entertainment industry, with his bare-knuckle approach at his groundbreaking Creative Artists Agency.

So, if you put them together, as happened recently at the Sand Hill Road offices of the Andreessen Horowitz venture firm, you get what turned out to be a very interesting discussion.

In fact, Andreessen actually interviewed Ovitz in front of a private audience about his life and philosophies.

BoomTown attended the event, which had been off the record until now, when a video of the talk was provided to All Things Digital.

The pair met up awhile ago, as Ovitz developed an interest in Silicon Valley after his glory days as an über-agent and his fateful stint as a top exec at Disney.

2010年12月7日星期二

How to Rip DVDs to iPod, iPhone, etc. with Handbrake

Do you want to watch your DVDs on your iPod, iPhone or Apple TV? Here's a guide which explains how to use an excellent software - Handbrake to rip DVD's into MPEG-4 video files.

Requirements:
1. VLC player (Handbrake 0.9.3 and higher)
2. iTunes 6.0.1 or later
3. QuickTime 7.0.3 or later
4. 500 MHz processor or better with at least 16MB of video RAM
Step 1: Download Handbrake
Download Handbrake from here and install it. Handbrake is free. If you already have Handbrake installed, please check to see if your version is out of date. Several new improvements have been made recently to the program, specifically for the iPod and iPhone.
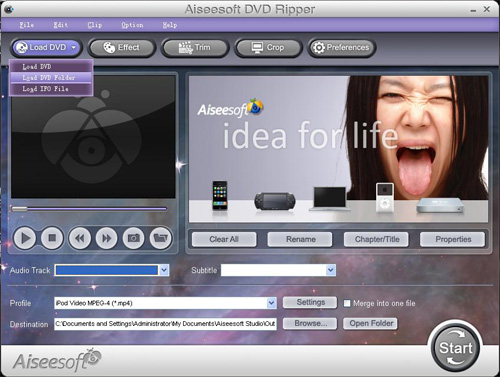
Download Handbrake

Step 2. Insert DVD
Grab a video DVD and put it into your computer. Handbrake can only convert standard video DVD's that you would normally play in a DVD player. If you have a DVD-ROM with video files saved on it as individual files (AVI, MPG, WMV, MOV, etc), Handbrake will NOT be able to convert these files. Handbrake only wants standard video DVD's.
Depending on your computer's preferences, the DVD Player application might automatically open. If it does, just quit it. Only one application should be accessing the DVD at a time.
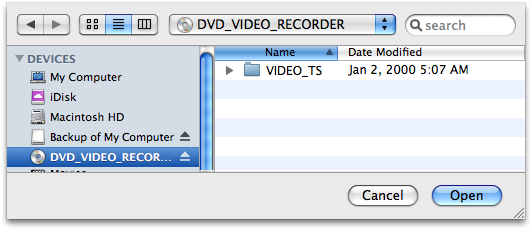
Launch Handbrake. A screen asking you to select a DVD will appear. Select the DVD you've inserted into your computer and press the Open button.

Insert DVD

Step 3: Download VLC player
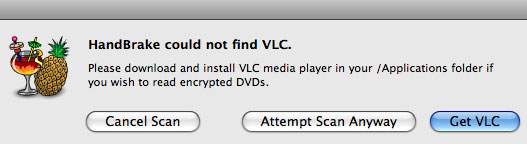
What version of Handbrake are you using? As of version 0.9.3, Handbrake will no longer natively rip DVDs. Weird right? I wonder if they were getting some pressure from the movie industry. But don't give up on Handbrake just yet. You can still use Handbrake 0.9.3 to rip DVDs, you just need to install VLC on your machine first.
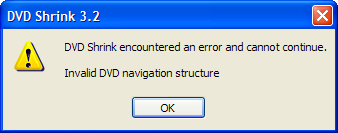
If you see the VLC screen like the one shown below, then you need to download and install VLC.

VLC on Mac

VLC Download Page:
http://www.videolan.org/vlc/

The VLC media player is a highly portable multimedia player for various audio and video formats (MPEG-1, MPEG-2, MPEG-4, DivX, mp3, ogg, etc.) as well as DVDs, VCDs, and various streaming protocols. It can also be used as a server to stream in unicast or multicast in IPv4 or IPv6 on a high-bandwidth network. Handbrake now uses some components of the VLC player and it must be installed if you want Handbrake to read DVDs.
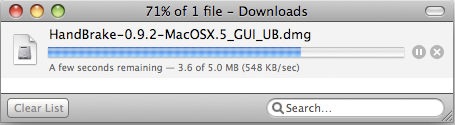
After you download VLC, you need to install it on Mac:
VLC for Mac OS X is distributed as a disk image. Download the .dmg file, open it, and copy VLC to your hard drive (for instance the /Applications folder). Open VLC by double-clicking on it.

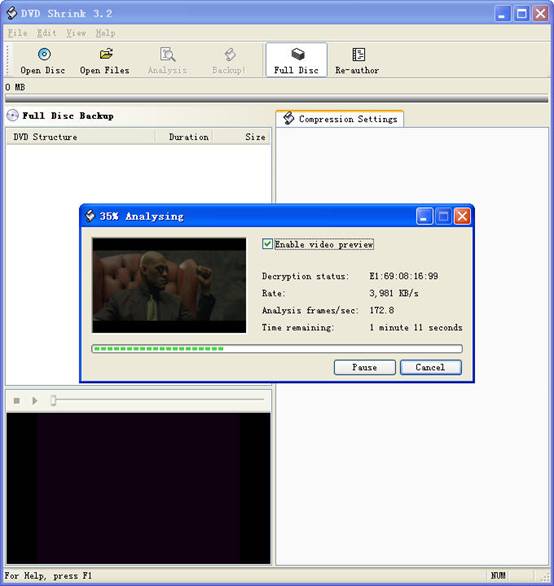
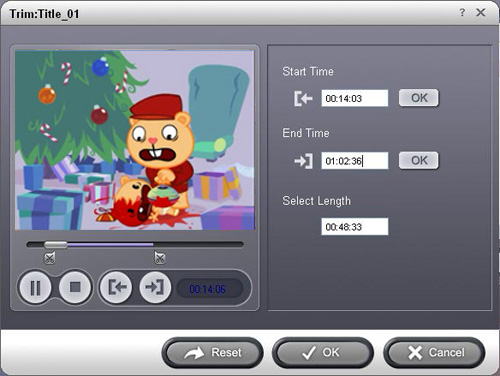
Step 4: Source Settings
Handbrake will now scan your DVD. This makes take up to a minute or two depending on the contents of the DVD and the speed of your optical drive.

scanning

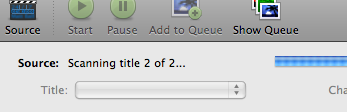
Title: By default, Handbrake will select the longest title in the list. However, this may not be the content you want.
Movies: If you are ripping a movie, the longest title is usually the main feature.
TV Shows: If you are ripping a DVD containing TV shows, you should see a list of several titles all about the same length. The shorter titles on the DVD are usually the video backgrounds used in the DVD menu screens and DVD extras like movie trailers. Unless you are a graphic artist, you probably don't want these tracks.
The shorter titles on the DVD are usually the video backgrounds used in the DVD menu screens and DVD extras like movie trailers. Unless you are a graphic artist, you probably don't want these tracks.

Title

If you only want to rip one title but aren't sure which one, you can click on the Picture Settings button (bottom right of the Handbrake interface) and manually step through several frames of the title to see what it looks like.
NOTE: Sometimes Handbrake is unable to see every track on a DVD. We've noticed issues with very old DVD's from the mid-1990s (before the days of fancy menus and Bonus features) and some newer DVD's like Stealth. There are different techniques and methods to authoring DVD's Sometimes the tracks get nested in weird ways that prevents Handbrake from seeing them. Other DVD ripping applications like Mac The Ripper and OSex might be able to see these tracks. Look for the longest track. That is probably the main feature.

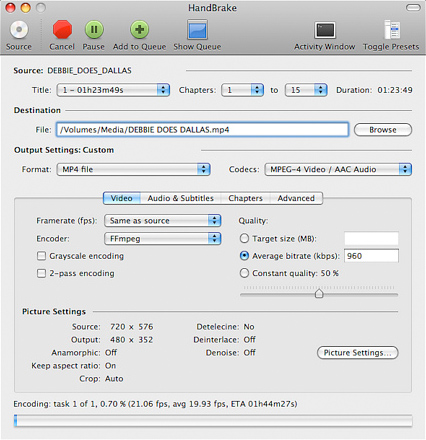
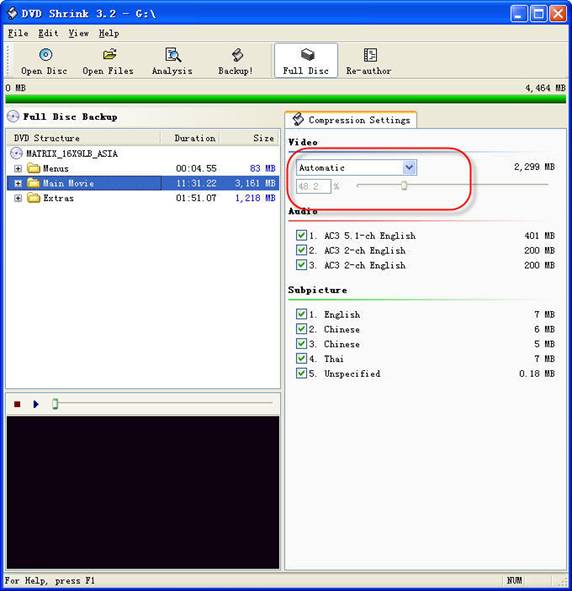
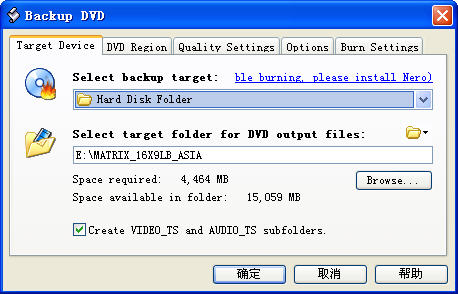
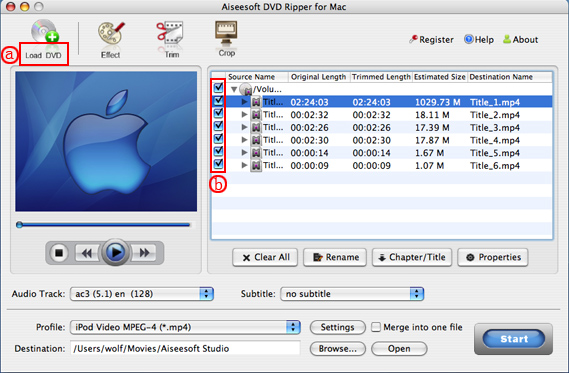
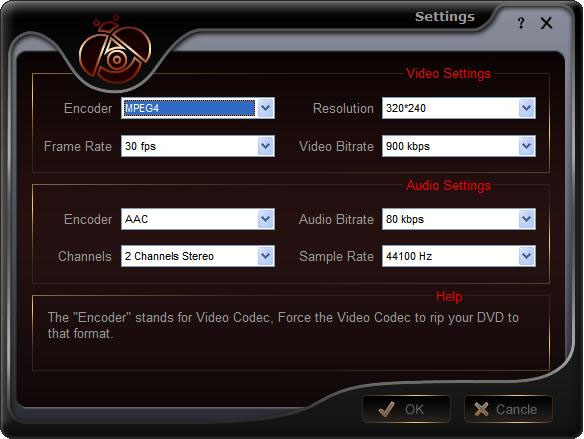
Step 5: Destination Settings
The Destination section has 3 settings you can modify: file format, codec and file destination.
File Destination: You can name your file and choose its destination using this box. Try to pick a location that has sufficient disk space to store the ripped file. On average, you need about 1 GB per full length movie.

File Destination Settings

Step 6: Select A Preset
Handbrake has a variety of handy DVD ripping presets for iPod, iPhone, Apple TV, Xbox, Sony PSP and many more. Just select a preset and Handbrake will automatically fill in all the settings for you.

Preset

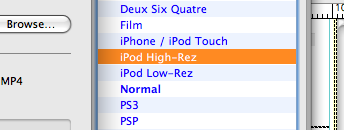
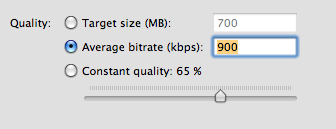
If you plan on watching this DVD on your iPod, iPhone or even Apple TV, we suggest you select iPod High-Rez and drop the average bitrate to 900 kbps. This will give you a nice high quality file that will work on both big (HDTVs) and small screens (iPod/iPhone) and won't take up a ton of hard drive space.

Handbrake - quality

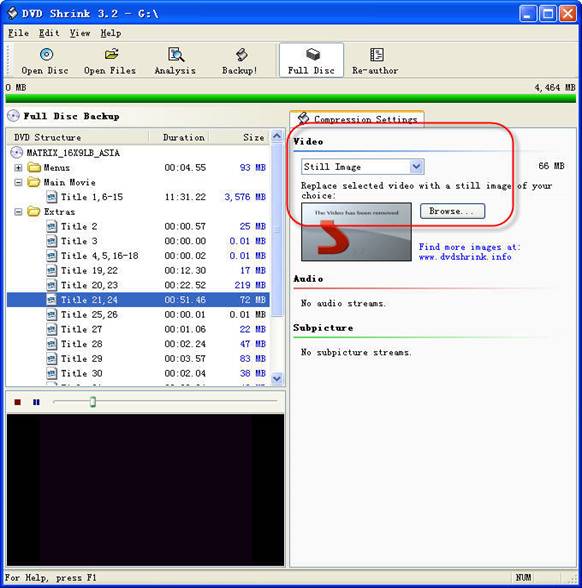
Step 7: Picture Settings
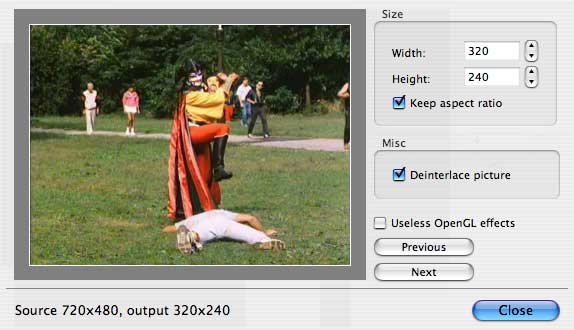
Click on the Picture Settings button to launch a separate window. The only thing you really want to do here is to compensate for interlaced or grainy, compressed looking video. Handbrake will have adjusted everything here for you based on the preset you selected.
Sometimes video files will have horizontal lines in them. This is called interlacing. To get rid of interlacing, try turning on the Deinterlace option and select "Fast." The image below is animated and will toggle between when the deinterlace option is turned on or off. You can really see the difference around the edge of the flipper.
Handbrake - deinterlace

Denoise will help get rid of graininess and Deblock will help clean up blocky or compressed looking video. Experiment and try to make your video clip look the best possible.
NOTE: Your iPod really only wants video files that are 320 pixels wide by 240 wide. If you don't plan on watching this ripped DVD on anything else, you can mess around with the settings. Turn on the "Keep aspect ratio button" and decrease the Width until it says 320. Handbrake will auto-adjust the height to match the width. If your video source is 3:4 (full-screen), the height will be 240. For wide-screen content, the height will be a lower number. This is fine and isn't something to worry about.
But if you plan on watching this video on your TV with an Apple TV or an iPod Video dock, then you should keep the video size big. If you don't have the money for an Apple TV, there's this amazing iPod video dock called the Keyspan TuneView. If you want to hook your iPod Video up to your TV, you should check out the TuneView.

Handbrake - size

Step 8: Rip
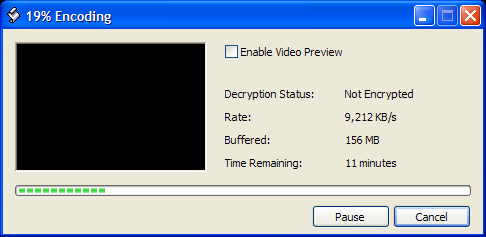
Finally! Click on the Rip button and stand back. The encoding time will depend on several variables including: the duration of the video file, the speed of your computer, what other activity your computer is currently doing, the codec you selected (H264 or MP4) and if you decided to do a 2-pass encoding or not.

Handbrake - encoding

Handbrake will attempt to provide you with an ETA. The time will increase if you Pause the encode or do anything that will hog the processor like start a 3D render in Maya. We suggest you do your DVD ripping overnight or at a time when you don't need to use your computer.

Handbrake

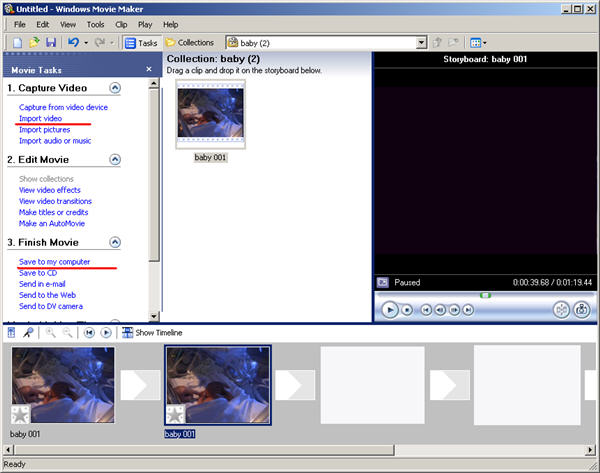
Step 9: Import Into iTunes
Connect your iPod Video or iPhone to your computer using the cable it came with and open iTunes (Applications > iTunes).
Drag and drop the video file into your iTunes library, or select Add to Library... from the File menu.
Make sure the video file you just added to iTunes is in a Playlist that will get synced to your device.
Select "Sync"
The sync may take a few minutes. Once the import completed, you could find the file which is ripped by Handbrake on your iPod or iPhone.

2010年12月6日星期一

How to get songs, pictures and videos from iTunes, iPod, iPhone to computer and then to Zune

This is a step by step guide to tell you how to get all songs, pictures and videos from iPod, iPhone to computer (including windows PC and Mac OS X) for free. In the event that you accidentally delete your music from your computer, it is possible to recover your songs from your iPod as long as you follow this tutorial. And then you can put these songs, pictures and videos to Zune, PSP, Sandisk, Pocket PC, PowerPoint, Cell phone, Creative Zen, PDA, Archos, iRiver, Apple TV, Xbox 360, PS3 and other MP4 player. If you want to put the iTunes videos to Zune and other mp4 players, You can transfer iTunes videos to iPod touch, iPod classic, the latest iPod nano and iPhone(iPhone 3G) firstly.
This guide includes two parts:
Part 1, How to get songs, pictures and videos from iPod, iPhone to computer for free
Part 2, How to put iTunes videos, iPod and iPhone videos to Zune, PSP and other MP4 player.

Part 1, How to get songs, pictures and videos from iPod, iPhone(3G) to computer for free
1. How to get songs, pictures and videos from iPod, iPhone to Windows PC for free
ml_iPod is a Winamp plugin that enables music to be loaded onto and off of an Apple iPod without using iTunes via Winamp's Media Library. One of the main attractions of the plugin is being able to transfer files from the iPod to your computer which is not possible with Apple's iTunes software. Winamp's newest iPod plug-in can indeed copy files from iPhone in Windows without jailbreaking. It also supports Creative Zen and PlaysForSure certified devices.
Download and install Winamp if you haven't yet. And then use it to get songs, pictures and videos from iPod, iPhone to Windows PC.
2. How to get songs, pictures and videos from iPod, iPhone to Mac OS X for free
Step 1,Download Senuti.
The latest version only works on Mac OS X 10.4 or higher. For OS X 10.3.9 users download Senuti 0.33 from the link at the bottom of the page. It always copy music from regular iPods to your Mac, and a new version now supports the iPhone and iPod touch.
Step 2, Install Senuti. Drag the Seunti application to your Applications Folder. Drag Senuti into your dock or save a copy on your desktop if you wish. Eject the Senuti disk image and clear your download folder.
Step 3, Make sure you have iTunes. Open iTunes.
Step 4, Plug your iPod into your computer. Set your iPod to "Manually manage music and videos" in iTunes.
Step 5, Open Senuti. Songs with a note next to them are already in iTunes. However if you changed song information separately in your iTunes library or your iPod, it will think the same song is two different ones.
Step 6, Go to "Preferences" and then "Copying" in Senuti. Choose the iTunes Music Folder as the "Save Location" for copied music. Otherwise two copies will be created of each song and will fill up hard drive space.
Step 7, Highlight and drag songs from "Library" into "iTunes". You can also drag and drop playlists from your iPod into iTunes. Make sure all the songs look normal and that there are no double copies.

Part 2, How to put iTunes videos, iPod and iPhone videos to Zune
If you want to put iTunes videos to Zune, you can transfer the iTunes videos to iPod or iPhone at first and then get the videos from iPod and iPhone to Computer. Now we can put the videos that have got from iPod touch, iPod Classic, iPod Nano and iPhone to Zune.

Zune only supports the follow video formats:
Windows Media Video (.wmv)
MPEG4 video (m4v, .mp4, or .mov)
H.264 video (.m4v, .mp4, or .mov)

If the videos are the zune format files, you can transfer the videos to Zune using zune software.
Here is the steps:
1. install zune software, you can download it from here for free
2. plug in your zune player to computer
3. drag the wmv video to zune library
4. click "start sync" to sync your zune. OK.
If the videos are not the zune format, You need use Total video converter to convert the videos to Zune format so that you can put the iTunes videos to zune. And then you need to use zune software to transfer the videos to zune.
The total video converter can also convert videos for Apple TV, PSP, Pocket PC, Creative Zen, Archos, and a lot of MP3 players and audio players. So you can also put the iPod videos, iPhone videos and iTune videos to Apple TV, PSP, Pocket PC, Creative Zen, Archos, and a lot of MP3 players.
If you are a Mac user, use this video converter for Mac to put iTunes videos to Zune and other MP4 players.

There as also many other applications and methods for copying music from an iPod to your computer as there are iPod models themselves, which makes finding a sure-fire, free solution a matter of tedious trial and error. Whether you're a Windows user looking to yank tunes from an iPhone, a Mac fan backing up an iPod classic, or a Linux enthusiast trying to get into your new nano, we've got you covered. Follow along for a detailed look at the best ways to transfer songs from your iPod to your computer, no matter what hardware or operating system you're rocking.
1. Floola (Win, Mac, Linux) - portable iPod manager.
Features: (1) move audio and video to/from iPod, (2) manage and import/export playlists, (3) last.fm support, (4) multi-lingual, (5) lyrics and podcasts support, (6) search files, (7) iPod troubleshooting, (8) manage notes, (9) sync files between PC and iPod
2. YamiPod (Win, Mac, Linux) - yet another portable iPod manager.
Features: (1) playlists import/export (PLS,M3U), (2) PC to iPod autosync, (3) built-in music player, (4) last.fm support, (5) search, (6) song list export and more
3. Sharepod (Win) -
Features: (1) move files to/from iPod, (2) built-in music player, (3) search, (4) create winamp-style playlists, (5) network file sharing (office, college, etc.), (6) built-in music player and more
4. Ephpod (Win) - not as flexible as the ones above but has couple of cool
features: ultra-fast song transfer, powerful playlist creation features, one click sync, winamp support, bunch of extras (news, weather, movie listings, etc.)
5. Rockbox - open source replacement firmware for mp3 players.
Features: (1) dynamic playlist creation, (2) multiple themes, (3) gapless playback, (4) in-built clock, (5) tagging, (6) plugins and more
6. Amarok (Linux) - iTunes alternative.
Features: (1) manage, create playlists , (2) podcasts support, (3) last.fm support more
7. Rhythmbox (Linux) - integrated music management application (inspired by iTunes)

iPod Compatible Video

This article is divided into four parts separately introduce what is iPod Compatible Video, which video format is better for Apple iPod Video, is my video iPod compatible and how to make the video compatible with your iPod.

Part One: What is iPod Compatible Video?
Part Two: Which video format is better for Apple iPod video?
Part Three: Is My Video iPod Compatible?
Part Four: How to make the video compatible with your iPod?

Part One: What is iPod Compatible Video?
Firstly, I will introduce you what is iPod Compatible Video, iPod Nano Compatible Video such as iPod Video MP4, iPod Video H 264, the specifications page lists the following:
Apple iPod video specifications from their official website:
H.264 video, up to 1.5 Mbps, 640 by 480 pixels, 30 frames per second, Low-Complexity version of the H.264 Baseline Profile with AAC-LC audio up to 160 Kbps, 48kHz, stereo audio in .m4v, .mp4, and .mov file formats; H.264 video, up to 2.5 Mbps, 640 by 480 pixels, 30 frames per second, Baseline Profile up to Level 3.0 with AAC-LC audio up to 160 Kbps, 48kHz, stereo audio in .m4v, .mp4, and .mov file formats;
MPEG-4 video, up to 2.5 Mbps, 640 by 480 pixels, 30 frames per second, Simple Profile with AAC-LC audio up to 160 Kbps, 48kHz, stereo audio in .m4v, .mp4, and .mov file formats.

That’s a little confusing, but there’s only a few numbers you’ll need to remember for each format.

iPod H.264 Video format
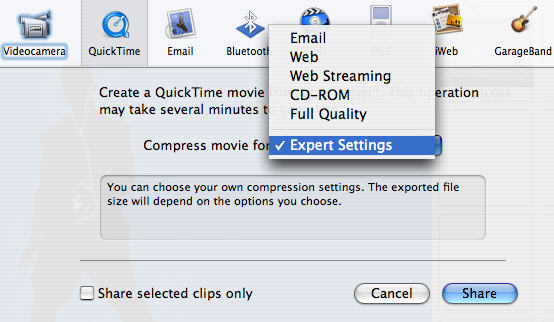
The highest video bitrate with the H.264 codec is 768 kilobits per second. The biggest picture size for your H.264 movie is 320 pixels wide by 240 pixels high, the exact dimensions of your iPod’s screen. Your iPod can play H.264 video at framerates up to 30 frames per second. Every one of the applications that we’ll be using encodes with the Baseline Profile. Your audio needs to be encoded as AAC audio up to 160 Kbps, 48 kHz, and it can be in either stereo or mono. As long as you follow all the guidelines, your movie can be a QuickTime movie or an MPEG-4 movie file.

iPod MPEG-4 Video formatYour other option, MPEG-4 video, supports a much higher bitrate than H.264 video - 2,500 kilobits per second. Using higher bitrates will also create larger files. The result: you’ll have less space for additional songs and movies. The biggest picture size for your MPEG-4 video is 480 pixels wide by 480 pixels high - three times as many pixels as your iPod’s screen is capable of displaying. Your iPod will shrink the picture proportionally so that everything fits on the screen. Again, the iPod can play videos up to 30 frames per second and our audio and file format options are the same as H.264 video.

Part Two: Which video format is better for Apple iPod video?
That’s a tough question. H.264 is arguably better because it offers high quality and a much smaller file size when compared to MPEG-4. However, both formats look quite good when you encode your video at the higher supported video settings. One thing that most people will agree on is that H.264 video takes longer to encode than standard MPEG-4. This means that converting a two hour movie to iPod video can take considerably longer using the H.264 codec (especially with QuickTime Pro’s pokey Export: Movie to iPod video option). Still, I prefer the H.264 codec in most instances.

Part Three: Is My Video iPod Compatible?
Some of the video files that you download from the web or from file sharing networks like BitTorrent may be iPod compatible - even if they’re not marked as such.

The easiest way to determine whether a video can be played on your iPod is to open the file in QuickTime and select Window: Show Movie Info. In most cases your video should be iPod-ready if the format is H.264 or MPEG-4, the audio is AAC, and the size of your video is 320 x 240 (or smaller) for H.264 or 480 x 480 (or smaller) for MPEG-4. Also, look at the data rate and make sure it’s not over 900 kbits/sec for H.264 or 2600 kbits/sec for MPEG-4.

QuickTime info for iPod Video

Part Four: How to make the video compatible with your iPod?
If you have QuickTime Pro ($30 and worth every penny) or the latest version of iTunes (free!), this is, by far, the easiest conversion that we’ll talk about.

In iTunes, after you’ve added your video to the library, right click it. Select Convert Selection for iPod. iTunes will let you know if your video is already in the correct format. If it’s not, your video will slowly be converted to an H.264 video.

UPDATE: I’ve heard several complaints of iTunes creating iPod videos without sound. You should probably avoid using iTunes to convert your videos.

In QuickTime Pro, open your movie and, in the file menu, select Export… and in the export drop-down, select Movie to iPod (320 x 240) and click Save. QuickTime will create an optimized H.264 video with AAC audio.

You may want to go pour yourself a cup of tea or take a nap. If your file is large, QuickTime’s slow conversion process can take several hours.

If you’re an inexperienced user, I recommend using QuickTime Pro or iTunes because they’re absolutely foolproof. However there are other much faster, more powerful applications for converting your videos. Read on!

Don’t have QuickTime Pro? Aiseesoft iPod Video Converter!
Aiseesoft iPod Video Converter supports so comprehensive video formats including converting MPG, MPEG, MPEG2, VOB, MP4, M4V, RM, RMVB, WMV, ASF, MKV, TS, MPV, AVI, 3GP,3G2, FLV, MPV, MOD, TOD to iPod Video MP4, iPod Video H 264. You can customize your own output video by the settings function. For example, if you want a high quality video you can raise the values of Video Biterate, Audio Biterate and Audio Sample Rate, if you want a smaller file you can reduce the value.

Settings

If you want to make your DVD compatible with your iPod and even transfer your iPod video to Computer, you can choose Aiseesoft DVD to iPod Suite which is an all-in-one solution to convert DVD to iPod Video MP4, iPod Video H 264 and convert video to iPod Video MP4, iPod Video H 264. Moreover, it can transfer video from iPod to computer. You don’t need to worry about losing anything.
For Mac user, you can choose Aiseesoft iPod Video Converter for Mac and Aiseesoft DVD to iPod Suite for Mac.

2010年12月4日星期六

Thanks, but No Thanks: Did Groupon Just Pull a Facebook?

There is a precedent for social buying site Groupon walking away from a $6 billion offer from Google, if that’s exactly what happened.

Let’s call it: The Zuckerberg Gambit.

That would be in reference to the famous series of no’s that the then flip-flopped co-founder and CEO of Facebook, Mark Zuckerberg, gave to a series of suitors who came calling with big bags of dough to buy the social networking site.

There were media suits from Viacom ($750 million). And Internet suits from Yahoo ($1.1 billion). And software suits from Microsoft ($3 billion).

And, often over the objections of his much older and more experienced investors, Zuckerberg declined to be acquired.

Instead, he got massive funding by Microsoft and others.

Presumably, he had a dream of much more and, as it turned out, he was right.

Facebook is now valued at upward of $45 billion, although it has yet to test out that lofty figure in the public markets.

And Zuckerberg is the king of all he surveys, from a social networking point of view, at least.

Perhaps most ironic of all: Facebook’s success is scaring Google on a daily basis, so much so that it turned its local eyes to Groupon.

Interestingly, both Facebook and Groupon share common investors–Silicon Valley’s Accel Partners and Russia’s DST Global.

Those investors have often spoken of not selling out, and their start-ups seem to have that proclivity too.

Chicago-based Groupon and its CEO Andrew Mason, for example, have turned down two big money exits so far this year–$3 billion from Yahoo and presumably the one from Google.

Talk about no exit.

While there are sure to be conflicting stories over the next few days–Did Google get cold feet first? Was there a tussle over a breakup fee, in case of too much regulatory scrutiny? Were the cultural differences too much?–one thing is certain:

Now, Groupon is going to have to go for it, as they say in sports, and try to turn itself into a real-live business.

One would assume they worried about the difficulties of being absorbed into the Borg at Google and about the definite regulatory hurdles that might have been impossible to leap.

And, perhaps, they just thought they could do better on their own.

In many ways, it’s an admirable choice–whether it is a wise one remains to be seen.

2010年12月2日星期四

BermanBraun Doesn’t Just Make Web Sites (“The Cape” on NBC Debuts Soon)

Here is a new teaser trailer for a midseason replacement television show on NBC called “The Cape.”

It’s from Hollywood multimedia production company BermanBraun, which is known in tech for the handsome content sites it makes for Microsoft’s MSN portal, such as the celebrity-focused Wonderwall.

And partner Lloyd Braun also ran Yahoo’s media unit for a bit.

“The Cape” is about a good cop who is framed and has to turn himself into a crime-fighting hero to regain his old life and family. With a cape, natch.

There is a lot of broodiness and moodiness and there are also carnival misfits in the show, which premieres January 9.

2010年12月1日星期三

Kindle Feels iPad’s Heat, Sees E-Reader Lead Going Up in Smoke

When Apple CEO Steve Jobs first announced the company’s new iBookstore and iBooks application for the iPad back in January, he said that while Amazon had done a great job with its Kindle e-book reader, Apple planned to “stand on their shoulders and go a little further.” And while that remark might have seemed like simple Jobsian bravado at the time, these days it’s looking downright prophetic. According to a new survey from ChangeWave, the iPad has doubled its share of the e-reader market since August and is now just 15 percentage points shy of the Kindle (click image to enlarge).

Of the 2,800 respondents ChangeWave surveyed, 32 percent used the iPad as their e-reader and 47 percent the Kindle. That’s far less of a disparity between the two than we saw in the research outfit’s August survey, which found 62 percent of respondents using a Kindle and just 16 percent using an iPad. In other words, by this measure, between August and November, the iPad’s share of the U.S. e-reader market rose 16 percentage points and the Kindle’s fell 15 points. And that trend seems likely to continue in the months ahead. Of those respondents planning on buying an e-reader in the next 90 days, 42 percent said they’d like an iPad while only 33 percent said they’d opt for a Kindle.

Said ChangeWave’s director of research, Paul Carton, “The Amazon Kindle is hanging on to a rapidly diminishing lead over the Apple iPad among current e-reader owners….The iPad is likely to be the biggest beneficiary of the expanding e-reader market this holiday season.”

If that’s the case, Credit Suisse analyst Spencer Wang’s prediction in February that Amazon might see its e-book market share slip from 90 percent to 72 percent this year and to 35 percent by 2015 might not be so far off.

2010年11月29日星期一

How to change iPhone Wallpaper

Here are the easy steps you can take to change iPhone Wallpaper easily.

Make preparations:
Step 1: Find an image that you would like to use as wallpaper from iPhone Wallpaper.
Step 2: Right-click on a PC or control-click on an Apple computer and select "Save As" to save the image to your computer. Save it to your "My Pictures" folder or iPhoto library on a PC or Apple respectively, or wherever you prefer to store your images on your computer as long as you will be able to easily locate it.
Step 3: Connect the iPhone to your computer with the USB cable and wait for iTunes to launch itself automatically. Click on the "Photos" tab in the side panel.
Step 4: Click on the "Sync Photos From:" tab in the "Photos" menu on iTunes and locate the folder where your photos are stored. Select all of the images that you would like to transfer your to iPhone. Click on "Sync" in iTunes to transfer all of the photos to your iPhone.

Change iPhone Wallpaper
Step 1: Tap Settings on the iPhone’s home screen:

Change iPhone Wallpaper

Step 2: Tap the Wallpaper tab:

Wallpaper Tab in iPhone Settings

Several tabs should appear, including one that says Wallpaper. You can tap any of the tabs to select wallpaper for the iPhone. The Wallpaper tab features a collection of pictures supplied by Apple. The other tabs feature pictures you have added to the iPhone, including those taken with the iPhone’s camera.

Wallpaper Selections

Step 3: Tap any picture. A preview screen of the wallpaper will appear, along with the words Move and Scale at the top. You can pinch and reverse pinch the picture to resize. The transparent bars at the top and bottom simulate the bars for the clock and Slide to unlock that will eventually display on top of your wallpaper.
In the example below you can see that the heads of the two peoples will be partially covered by the top bar:

Resize iPhone Wallpaper

To fix, I will reverse pinch to expand the picture, then drag the picture so that their faces appear in the center:

Resize iPhone Wallpaper
Step 4:
Tap Set Wallpaper to finish.
To view your new iPhone wallpaper, put the iPhone to sleep by pressing the sleep button on the top of the iPhone. Then hit the home button to wake the iPhone, and you should see the wallpaper.
Note the position of the clock and Slide to unlock transparent bars. If you’re unhappy with the position of the wallpaper, repeat the steps above.

2010年11月28日星期日

How to upload videos to YouTube easily and quickly on Mac

Google has released basic software called Vidnik which is the quickest, simplest way to make movies using the built - in camera on your Macintosh and upload those movies to your YouTube account. You must first sign up for a free YouTube membership to upload videos. You can use Vidnik to create a video diary, or just to quickly record a video comment to attach to an existing YouTube video. Vidnik works with the built-in video cameras on recent Macs, with Firewire video cameras, and with many USB video cameras.

Part 1, use Vidnik to Record video segments using your iSight camera and upload them to YouTube.

upload video to YouTube

To use Vidnik, run the app, then click the record button to start recording. Click it again to stop. Trim to just the golden moments you want to keep, as in the screen shot above. Fill in the required title, description, and so on. Click the upload button. That's it.

Part 2, Use Vidnik to upload videos to youtube
You can drag movies made in other programs onto Vidnik's column of movies, and then click the upload button. And to use another program to do a little post-production, use the Gear menu to show Vidnik's movie file in the Finder. Edit the movie in the other program, and then upload it.Vidnik can only support videos such as: 3GP, AVI, DAT, MOV, MP4, M4A, WAV, AAC. It does not support ASF, FLV, MPEG, RM, WMV, MP3, AC3.
You can use the video converter for Mac to convert your videos to the formats that Vidnik can run.
If you want to upload DVD to TouTube, you need to use DVD ripper to rip DVD to video formats supported by YouTube first. If you are Mac user, you can use this DVD ripper for Mac .

upload DVD to YouTube