BoomTown is not even going to try to explain this trailer for the movie “Jackboots on Whitehall,” except to say:
No 3-D.
Foul-mouthed puppets.
World War II.
BoomTown is not even going to try to explain this trailer for the movie “Jackboots on Whitehall,” except to say:
No 3-D.
Foul-mouthed puppets.
World War II.
Sales at XS International Inc., a 10-employee company that sells refurbished electronics like computers, disk drives and servers, have shrunk 50 percent in the past two years. The problem, the company says, is that it no longer qualifies for roughly half the government contracts it once did.
XS International is an independent seller whose business, while legitimate and legal, doesn’t follow certain requirements set up by large manufacturers like Cisco Systems Inc. (CSCO) and Hewlett-Packard Co. (HPQ) to qualify as an “authorized” dealer of those companies’ equipment.
Authorized companies, in most cases, receive inventory directly from the manufacturers and set prices based on manufacturer’s suggested retail price. Independent resellers sell used, refurbished or “gray market” equipment—factory-sealed equipment purchased on the open market—and set the prices for those products.
Independent dealers say large manufacturers in recent years have encouraged customers, including the government, to buy goods through authorized channels only, which the manufacturers say helps ensure the merchandise isn’t counterfeit.
He told the crowd at Goldman’s media conference this morning that the cable bundle is going to go the way of the wireline telephone business. That is, the next generation of consumers won’t have any interest in paying for it.
“Young people are pretty smart. They’re not going to pay for something they don’t need to,” he said. “Over the top is going to be a pretty big issue for cable.”
But that’s an issue for Verizon (VZ), too, right? Seidenberg’s company sells its own version of the cable bundle, via its Fios service, and it has 3.5 million customers. And Seidenberg noted that the TV bundle isn’t going away immediately. But it will, he said.
“We take the over the top issue with video very seriously,” he said. “I think cable has some life left in its model…but that it is going to get disintermediated over the next several years.”
Seidenberg’s argument is that over the top is a much bigger deal for cable guys like Comcast (CMCSA), who have an entire business built around the bundle, than it will be for his company, which is a relative newcomer to video. Theoretically, he’ll be be able to replace some video subscribers with subs who pay for robust broadband connections. But like it or not, it’s going to happen, he says.
“I’ve seen the movie. If you remain static too long, the technology is going to nibble at you on the edges, and you have to be prepared for it.”
Meanwhile, on the eternal iPhone question: Seidenberg repeated his standard line, which is that he’d very much like to offer Apple’s (AAPL) handset, and hopes to do so one day.
Existing versions of the iPhone won’t work on Verizon’s CDMA network, but he’s hopeful that the launch of its new 4G LTE network this fall will lead Apple to produce a compatible handset. Which it may very well be doing, anyway.
Meantime, he has a business to run, and he’s been activating a lot of Google’s (GOOG) Droids. Warning! Sports metaphor ahead: “This is like the Knicks getting Carmelo Anthony. Like it would be very good if the Knicks got Carmelo Anthony. But they have to play the game whether they get Carmelo Anthony, right?”
MTS or M2TS format is the equivalent of h.264 or MPEG-4 AVC. It is a fairly new High Definition codec that provides greater compression than the regular MP4 and others. Those two High Definition format always be used on HD Camcorder, such as Sony, Canon or Panasonic.
As they are HD video, most of our video editor such as windows movie maker can not edit it directly. And also you can not upload it to youtube.com and share with your friends.
So you need to convert them into normal video format, such as wmv, mp4, avi and so on.
Here I know a really powerful MTS Converter and M2TS Converter
And the process of operation is really easy and fast.
Part 1: How to convert MTS video
Step 1: Load Video
Click "Add File" to load the video that you want.
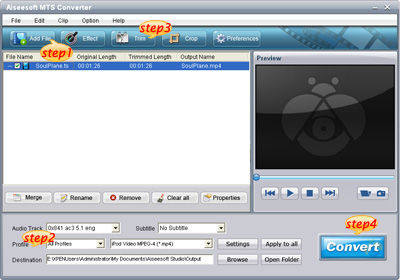
Step 2: Choose Your Output Profile and Settings
From "Profile" drop-down list you can choose your output profile according to your need.
For example, if you have a iPod and you want to convert video for it, you need to choose "iPod" from the profile list and then it also provides the second chance to specify your iPod generation.
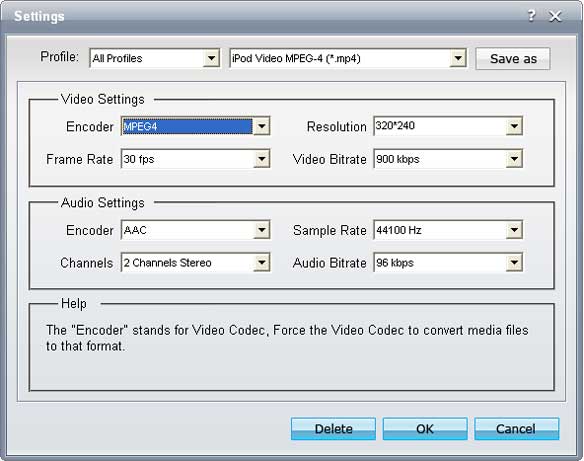
You can also click "setting" adjust the settings of your output video, such as "video/audio encoder", "Video/audio Bitrate", "Channels", "Resolution" and so on..
Step 3: Conversion
After you have done all the steps above you can click "Start" button to start your conversion.
Part 2: How to convert M2TS video
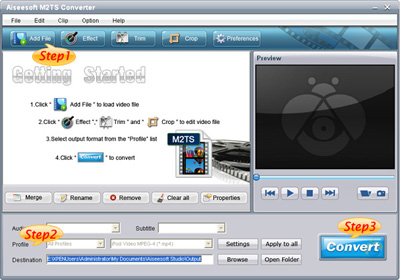
Step 1: Add File
Load your M2TS video.
Step 2: Choose Profile and Settings
Select your output profile according your need and adjust the settings of your output video if you like.
(the default setting works well)
Step 3: Start Conversion
Click "Start" to begin your conversion.
Here I also recommend you a really nice HD Video Converter, which can convert HD TS, HD MTS, HD M2TS, HD MPEG, HD WMV, HD MPG, HD MP4, QuickTime HD MOV, HD H.264, HD RM video, etc
1. How to change iTunes to recognize the new iPod touch
Some New iPod users may meet the situation that your iTunes can not detect your new iPod nano, iPod touch, or iPod Classic. It should recognize it immediately. If it doesn't, download the latest version of iTunes. The problem will be solved:
1) Re-launch iTunes, with and without your iPod plugged in.
2) With iTunes open, reset your iPod Touch
(here:http://docs.info.apple.com/article.html?artnum=305743 ) Press and hold the Sleep/Wake button and the Home button at the same time for at least ten seconds until the Apple logo appears.
3) Restart your computer leaving your iPod touch plugged in
Note: If you uninstall iTunes from a computer, it will be uninstalled for all the users. But it will show up again for all users once you re-install it again. Before uninstalling each user should backup his/her playlists so they can bring them back when the re-install is completed.No music for any of the users will be removed by iTunes. It will remain intact where it is saved.
2.'I can't turn on my iPod'
I have a 1st or 2nd generation video iPod (80 gig).
My computer is windows 2000 so I downloaded the windows 2000 iTunes. So I decided to update my iPod, it was updated and it was fine. It ran out of power. Then it won't turn on? I tried to charge it but it just keeps saying please wait such and such. I left it there for like 2 hours already, and still it didn't charge up... Is the problem because I updated my iPod or something else? And when I opened my computer, iTunes asked me if I can format my iPod into windows. I put yes, it didnt do anything.So I have to problems, its not charging.. and its not turning on.
by Ashley :'My friend had this same problem a few years ago.She just left it plugged in to her computer for a few days, waited it out... eventually the problem fixed itself on its own. I'd say just wait it out for a day or two, and if it's still having problems, take it in to your nearest Circuit City or something.”
by Karat :'its the most popular iPod problem. If you drain the battery fully, you're screwed. Basically the battery is down, but the darn thing wont charge unless you connect it to the usb and the usb wont detect it unless it has charge! So please take it to your nearest apple outlet.”
by Kylla :'The one thing you never want to do with an iPod is let it run out of power, not good for it at all :P I've done it a few times but try to avoid it. What you want to do is hold the menu button and the play/pause button at the SAME time and just wait for it. It should restart it. Thats how my iPod works, yours could be different so experiment with the buttons. Try holding perhaps the center button and the play/pause button? or center button and the menu button? Try to see which two buttons will restart it, its bound to work. But hold BOTH of them down at the SAME time with one hand..and be patient, wait for about 10-15 seconds or so. :)”
3. Why does my 30G iPod video always die quickly?
Even when I am just listening to music. It shuts off after about 45 min. And that is a problem because I am going on a plane trip soon and I plan to watch a movie on my iPod, but movies eat your batttery. Does this happen to anyone else???? How can I make the battery life last longer. btw, it is only like a year old.
by dipin :'In an iPod the battery life is different.
it doesnt depend on how old it is rather it depends on how many times you have charged and discharged it.
for increasing the battery life you should fully charge the battery every time you are charging it . and secondly you should never let it discharge completely . put it on charging just before it shows the red signal and disconnect it only when it is fully charged.
sorry to say but now u'll have to get the battery replaced from apple reseller if you want to watch complete movie the battery life as said by apple is 500 complete cycles of charging and discharging”
by sugadoll :'The same thing happened to me. The problem is that your computer can't detect a completly dead iPod, but you need the computer to charge it so your screwed. j/k I solved it by pluging it into my ihome dock that plugs into the wall. So if you have a wall iPod dock or a car one you can charge it enough so that the computer can detect it. Problem solved.
Recommended Products For you:
DVD Ripper for Mac
Convert DVD to any video or audio formats on Mac OS X. Aiseesoft DVD Ripper for Mac is a professional Mac DVD ripper software.
Video Converter for Mac
Convert all video formats from one to another on Mac OS X. Aiseesoft Video Converter for Mac is a specially designed Mac video converter.
That’s the word from Morgan Stanley analyst Katy Huberty, backed up by some recent comments by Best Buy (BBY) CEO Brian Dunn.
In a research note issued this week, Huberty points out that retail notebook growth in the United States fell four percent year over year in August after six months of decelerating growth. It did the same thing in the first week of September. And to Huberty, that’s the beginning of a trend. “We expect tablets to continue to pressure PCs as more vendors launch products (e.g., Dell Streak and Samsung Tab) and Apple expands its iPad distribution (e.g., China and five Latin American countries by September 17),” she wrote, adding that her model currently assumes the iPad is cannibalizing about 25 percent of notebook sales.

A big number, but don’t be too quick to dismiss it, because it’s actually smaller than the one put forth by Best Buy CEO Brian Dunn, who probably has a better sense of the market than Huberty. In an interview with The Wall Street Journal, Dunn said the retailer’s internal estimates suggest the iPad has cannibalized laptop sales by as much as 50 percent.
Of course, Best Buy’s metrics reflect just one portion of the laptop market–Stateside consumers; there are lots of laptops being sold elsewhere in the world and in the enterprise sector as well. Still, a head turner of a number and one that suggests the PC market is changing–and quickly too.
UPDATE: This just in from Best Buy, which has presumably gotten an irate phone call or two from the manufacturers of those laptops Dunn says fewer people are buying these days.
Statement: Reports of notebook, netbook sales declines grossly exaggerated
RICHFIELD, Minn., September 17, 2010 –In a statement today, Brian J. Dunn, CEO, Best Buy Co., Inc. (NYSE:BBY), likened recent rumors of a pending decline in notebook and netbook sales to a legendary Mark Twain-ism:
“The reports of the demise of these devices are grossly exaggerated,” Dunn said. “While they were fueled in part by a comment in the Wall Street Journal that was attributed to me, they are not an accurate depiction of what we’re currently seeing. In fact, we see some shifts in consumption patterns, with tablet sales being an incremental opportunity. And as we said during our recent earnings call, we believe computers will remain a very popular gift this holiday because of the very distinct and desirable benefits they offer consumers. That’s why we intend to carry a broad selection of computing products and accessories to address the demand we anticipate this season.”While it seems BoomTown is all about the who’s-leaving-Yahoo-now posts, it’s not so!
Case in point: Here are two folks the Silicon Valley Internet giant has just hired.
First, as announced in its Yodel Anecdotal blog yesterday, David Rice will join Yahoo (YHOO) as VP of Product for Media.
That means he will be managing the “strategy and execution for our News, Sports, Finance, Entertainment, Lifestyles, and Games product teams.”
Rice is from online video company Metacafe, where he was COO. He is also an ex-Yahoo, who worked as part of its international product team from 2005 to 2007.
Next is James Wildman, who will become managing director and VP of sales for Yahoo’s U.K. and Ireland unit.
He’ll start in January, after departing his job as managing director of Virgin Media’s ids advertising and media company.
I suppose it is too juicy a gadget not to make fun of–or, say, completely destroy.
That would be Apple’s (AAPL) magical iPad, which has been riding a media-hype wave of huge proportions since its debut earlier this year.
Thus, it is time to do a little bashing.
In the case of a commercial for the new Newsday app for the tablet device, quite literally smashing one to pieces–although in a very affectionate manner.
But for Amazon (AMZN) in its advertisement, it is a more obvious slap–as in, the iPad, unlike the economical Kindle, is a vampire that cannot go out into the sun.
The DVD protection technology makes it dead difficult to clone DVD to DVD folder for Mac, since the protection of DVD must be removed, can you finish the task to clone DVD to DVD folder.
Aiseesoft DVD Copy for Mac is very useful, and simple to use to clone DVD Mac, But this software only suit for the Mac type computer. Go ahead and download this DVD Copy for Mac.
Buy NowFree trial(Intel PPC)To see how the process of clone DVD to DVD folder for Mac, follows the following steps:
 Select clone DVD Mode: Choose “Full Disc ” button or “Main Movie Mode” button according to your needs.
 Select souce: Select DVD-video disc here to clone your DVD.
 Choose target: Choose DVD folder to continue.
 Start clone:Click”Start” to begin your DVD Clone Mac.
learn more on: how to edit DVD file with DVD Copy for Mac.
Many people download music from Limewire, but they can only listen them on computer. Put songs from Limewire to iPod touch is really difficult to many iPod users. Yes, you need to convert Limewire songs to iPod audio format by iPod Music Converter; actually, it is iPod mp3 converter or audio to mp3 converter, because iPod accepts mp3 audio files.
This article will share you how to add Limewire songs to iPod.
Part 1: For Windows users, how to add Limewire songs to iPod.
Step 1: Download Aiseesoft iPod Movie Converter
You need to download an iPod Music converter: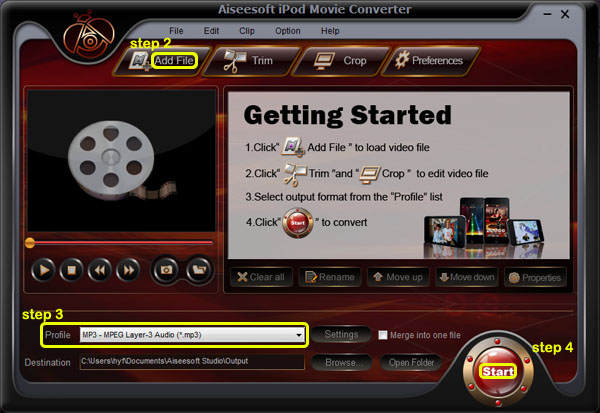
Step 2: Add Music
Click “Add File” and find your Limewire songs to load into iPod Music Converter
Step 3: Choose output format
You can choose output audio format from profile drop-down list—MP3
Step 4: Start to convert
Click “Start” button to begin your conversion.
Then you also need a tool to transfer your songs to your iPod.
Here I recommend you Aiseesoft iPod Transfer.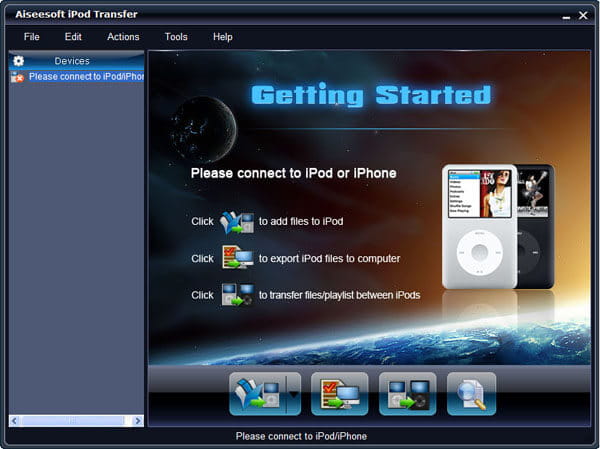
It is very easy to use:
Step 1: Connect iPod.
Plug your iPod to your computer via USB cable.
Step 2: Add songs
Click “PC to iPod” button to pick up the songs you have already converted and click “OK”. Now, you can enjoy your Limewire songs on your iPod at will.
Part 2: For Mac users, how to add Limewire songs to iPod
For Mac users, I recommend you Aiseesoft iPod Video Converter for Mac and Aiseesoft iPod Manager for Mac.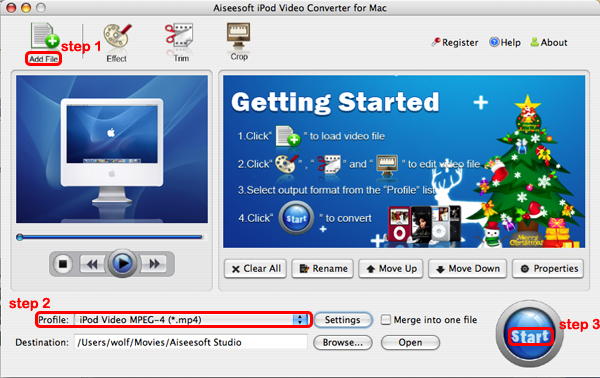
Step 1: Add file
Click “Add File” to load your music
Step 2: Choose output audio format
Click “profile” to choose your output audio format.
Step 3: Convert
Click “Start” button to begin your conversion.
To transfer converted songs to iPod, Mac users can use iPod Manager for Mac.
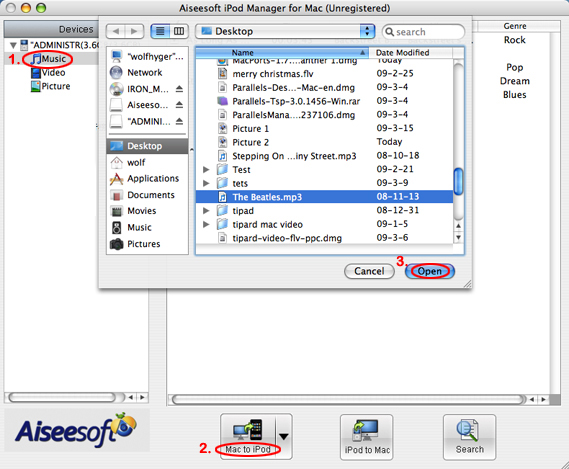
Step 1: Connect iPod
Plug your iPod to your computer
Step 2: Add music
1. Click “Music” (1)
2. Click “Mac to iPod” (2) and pick up the songs on your Mac you want to put on your iPod and click “Open” (3)
Few seconds later, the songs will be on your iPod.
The tutorial includes two parts. The part 1 will show you how to convert mpeg mp4 wmv flv 3gp avi to iPAQ video step by step with Aiseesoft Total Video Converter. And the part 2 will show you how to convert dvd movie to iPAQ video step by step with Aiseesoft DVD Ripper. The detailed steps are as follows:
Part1. how to convert mpeg mp4 wmv flv 3gp avi to iPAQ video?
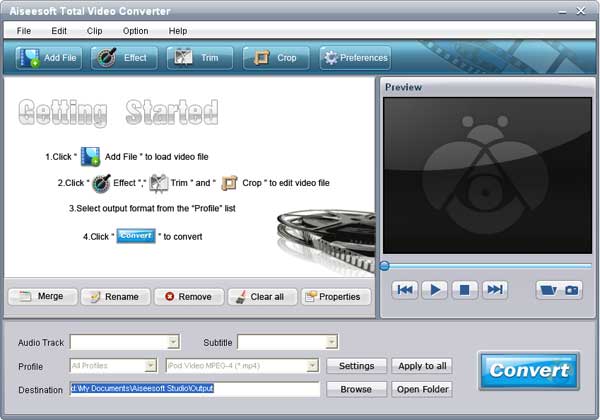
Aiseesoft Total Video Converter is a powerful iPAQ video converter which can convert various video formats including AVI, Divx, XviD, WMV, MPEG, MPG, FLV(YouTube video), RM, RMVB, TOD, MOD, ASF, H.264, etc to iPAQ video. And it is a video joiner, and video editor for you to convert video files to the formats you want, so you can enjoy you movie on all common digital players like iPod, Zune, iPhone, Apple TV, PSP, Xbox 360, PS3, Archos, iRiver, Creative Zen, PMP, Smart Phone, Pocket PC, PDA, Mobile Phone, etc.
Here's the tutorial about how to convert mpeg mp4 wmv flv 3gp avi to iPAQ video with Aiseesoft Total Video Converter
Step1 Free to Download Aiseesoft Total Video Converter and install it.
Step2 Click the "Add File" button to import your videos. If you experience any problems adding videos by directly clicking the "Add File" button, you can click "File -> Add File" to add the video files you want to convert from your computer.
Step3 This software can convert video to various video formats for PMP, Xbox 360, iPod, PSP, Zune, cell phone, etc. Click the "Profile" drop-down list to select the format "HP iPAQ Video(*.wmv)"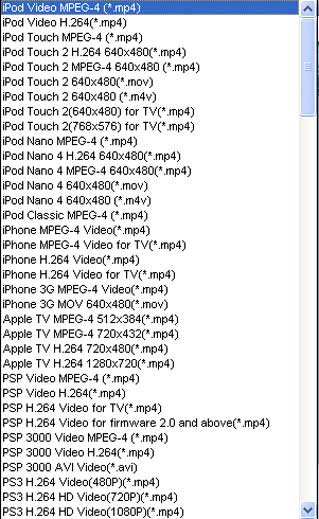
Step4 If you want to customize the output quality, click the "Settings" button to open the Settings panel, where you can set resolution, frame rate, video bit rate, audio bit rate, sample, etc.
Step5 Click the "Browse" button to specify a location on your computer to save the converted movie. If you want to open the output folder, you can just click the button "Open Folder". If you want to merge the added video files into one file, check the option "Merge into one file". By default, the the merged file is named after the first selected file.
Step6 When you get ready to convert the added video files, click the “Start” button to start conversion.
Part 2. how to convert dvd movie to iPAQ video?
Aiseesoft DVD Ripper is all-in-one, super fast DVD ripper software. The best DVD ripper can rip DVD movies to all popular video and audio formats. And it let you easily copy DVD movie to iPAQ video, iPod Video, Zune, iPhone, Apple TV, PSP, Xbox 360, PS3, Archos, iRiver, Creative Zen, PMP, MP4/MP3 Player, Smart Phone, Pocket PC, PDA, Mobile Phone, etc.
Step1. Download Aiseesoft DVD Ripper and install it.
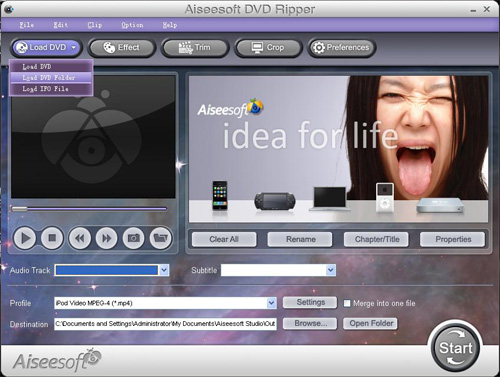
Step2. Insert your DVD disc into your DVD-Rom, then run the software, click "Load DVD" button and add the DVD file. You can also add DVD/IFO from your hard disk by clicking "Load IFO File".
Step3. This software can convert DVD to various video formats such as MPEG-4, AVI, WMV, FLV, 3GP, VOB, etc. Click the "Profile" drop-down list to select the format "HP iPAQ Video(*.wmv)".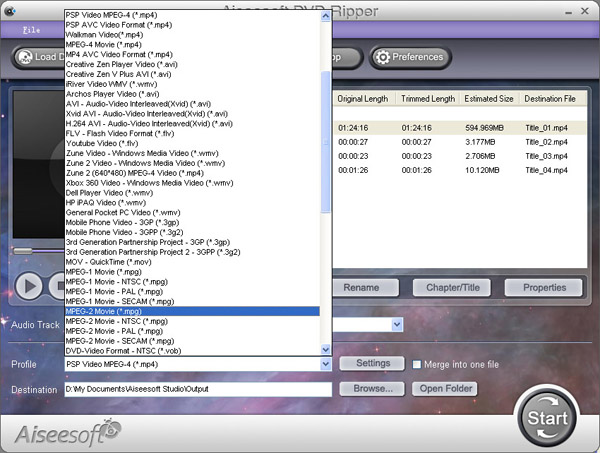
If you want to customize the output video, you can click the "Settings" button next to the format field to open the Settings window and set video resolution, frame rate, bit rate, encoder, etc. See the figure below: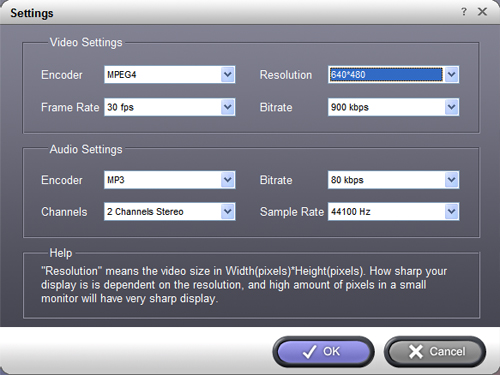
Step4. Select Subtitle and Audio
Regular DVD movies usually have several subtitles such as English, French, German, etc. You can select one you prefer. You can also delete the subtitle by selecting "No Subtitle", Selecting Audio is the same.
Step5. After the above steps, click "Start" to start conversion.
Taking photos is fun. Sorting and editing them is not.
I’ve got 54,220 photos on my computer, including a few would-be National Geographic covers but far more out-of-focus portraits and poorly exposed sunsets that I’ve never bothered to fix or delete.
Thanks to plummeting prices on digital SLR cameras, amateurs like myself can now experiment freely with artistic shots, taking hundreds of photos without spending a small fortune in film. But those experiments generate a lot of homework by way of virtual stacks of photos in need of processing.

Adobe Systems Inc.’s Photoshop is famous for helping photographers extract the most out of their shots in a digital darkroom. But at $699, Photoshop costs as much as a new camera and takes a graduate course to master. Moreover, Photoshop was designed to edit a single photo at a time, not for sorting through a collection.
A new generation of software from Adobe and Apple Inc. has emerged to fill the gap between Photoshop and entry-level photo-management software like Apple Inc.’s iPhoto and Google Inc.’s Picasa. For people who have graduated from point-and-shoot cameras, Adobe’s Photoshop Lightroom 3 ($299) and Apple’s Aperture 3 ($199) offer tools to organize large collections and tackle the nitty-gritty of digital developing and re-touching.
I’ve been testing Lightroom (for Mac and PC) and Aperture (for Mac only) to organize, process and share photos I took at my friends’ recent wedding. While both programs were designed with professional photographers in mind, I found they were effective at helping a hobbyist like myself whittle 400 photos to just 40 in less than an hour.
The programs also let me edit photos far beyond the basics of brightness and contrast. One shot moved from the reject to the favorites pile after Lightroom let me take advantage of my Canon camera’s advanced image format to boost the exposure of an image taken during a dimly lit reception.
Many professional photographers have a strong preference for one of the two programs. I preferred the overall aesthetic and photo-editing tools in Lightroom for extracting the best from my photos. Nonetheless, Aperture’s strengths lie in some nifty organizational tricks, and I would recommend it for people interested in three specific uses: upgrading from a large iPhoto collection; taking video with an SLR; or tagging photos with locations.
At their core, both Lightroom and Aperture are databases, but don’t let that scare away your inner Ansel Adams.
Lightroom’s database gives you tools to organize your photos into folders on your computer, create collections from across folders, and tag photos with keywords, star ratings, and other features. For people like me who are lazy about applying tags to describe photos, Lightroom offers a spray-can tool to virtually “paint” keywords on bunches of photos at one time.


Aperture’s approach to cataloging is borrowed from iPhoto. You put your photos into “projects” (known as “events” in iPhoto), which the software will suggest when you import images from your camera based on groups that were taken around the same time. You can also add keywords, ratings and other tags.
But Aperture has two more tricks up its sleeve. You can tag photos based on the people in them, using the same technology Apple built into iPhoto to recognize faces. While that’s a good idea, I found that Aperture (like iPhoto) didn’t do an ideal job at distinguishing faces, especially in profile.
Apple says the face-recognition function works best if you identify both a couple of front-on and profile photos for any person, and also let it finish going through your whole collection before using it.
More useful is Aperture’s ability to tag photos geographically. Some new cameras collect GPS data with each shot and Aperture charts that info with pins on a giant world map, making it fun to track a journey or search for all the photos taken in one place.
Unfortunately, the majority of cameras don’t capture GPS data, but Aperture does offer some tools for adding in location data after the fact, such as importing it from a photo taken by an iPhone at the same site. Lightroom can also record GPS data for photos, but you have to work with third-party plug-ins to get the same functionality as in Aperture.
It’s in the digital darkroom that both programs earn their keep. The biggest reason an SLR-owner should upgrade beyond a basic photo editor is so he or she can work with so-called RAW files, sort of digital negatives that use extra data from the camera’s sensor to give you artistic control over factors like exposure long after you’ve shot the photo. Both programs work well with RAW, and moreover, editing photos on both programs is nondestructive, which means you can undo any changes you make—all the way back to your original photo—even after the photo has been saved. Sometimes the sky really can be too blue.
I found Lightroom’s editing features to be the most intuitive. It uses a three-paned screen clearly showing all of the available adjustments, your photo, and a history of the changes made to the image. I felt Aperture made me hunt for some of those features, but some users may prefer its optional floating palettes to Lightroom’s dense panels of options, and also its elegant system for brushing changes onto an image.
Lightroom boasts some cutting-edge editing features, such as the ability to adjust photos based on profiles of the lenses used to take them. That’s especially useful if you are working with a wide-angle lens that can distort images. With the click of a button, a warped wall at the edge of a wide-angle photo is made vertical again. The lens profiling wasn’t automatic with my older-model Canon SLR, but still worked.
To be sure, there are well-known Photoshop tricks that neither of these programs can do, such as stitching two or more photos together. They also can’t digitally cut your ex’s head out of photos. But if you really need to do that, finding the right photo-editing software is the least of your problems.
And to my disappointment, both programs are missing an increasingly popular service called HDR, or high dynamic range, where you merge photos taken at different levels of exposure into a new photo that takes the best aspects of them all. To make these sorts of images, you have to download external plugins. That’s the occasion I most missed Photoshop.
Finally, the programs both offer tools to showcase shots in professional-looking books and prints as well as on websites like Facebook and Flickr. Lightroom has the most options for producing Web galleries.
Aperture will appeal to users with cameras that do the newest trick in digtial SRL photography: take video. Such videos, which can feature beautiful photographic characteristics like short depth of field, can be imported and edited right in Aperture. The videos can be included in the software’s handsome mixed-media slideshows without the need for a separate video-editing program.
Either Lightroom or Aperture are a worthy upgrade for any semi-serious photographer. Both are available to download for free limited trials and I’d suggest testing the workflow of both before committing your photo collection.
Confirming an earlier report at CrackBerry.com, RIM (RIMM) said it had snapped up the developer of Documents To Go–one of Apple’s best selling apps of 2009–along with much of the talent that developed it. “RIM has acquired some of the assets of DataViz and hired the majority of its employees to focus on supporting the BlackBerry platform,” the company said in a statement given to Digital Daily. “Terms of the deal were not disclosed but the transaction was not material to RIM in the context of RIM’s financial results.”
News of the acquisition follows DataViz’s cancellation of development for Docs To Go for webOS last Friday. Makes you wonder if the same fate awaits the versions for iPhone, Android, etc., now that the deal’s official.
This is a tutorial that explains the process of backing up a DVD on a PC using DVD Shrink. While there are many software solutions for backing up DVDs, the one on Windows I like is DVD Shrink. On Mac OS X, I like this DVD Copy for Mac.
that can copy DVD movie (D9 to D9, D5 to D5) with the entire movie in 1:1 ratio perfectly. This tutorial will be a concise explanation of how to backup DVD movie to DVD for free. There are many reasons to make a backup copy of DVDs one has purchased, keep reading to learn how to improve the quality of your re-encoded backups.
Step 1, download DVD Shrink
You can download DVD Shrink from: http://www.DVDshrink.org/.
For Mac users, you can download the DVD copy for Mac from here.
Step 2, Run DVD Shrink and insert your DVD movie into the DVD drive
The first thing you will need to do is open the disc. Click on "Open Disk" at the top-left of the program window. A small window will pop up. There is a drop down menu - select the drive and disk that you are going to backup. Then click OK. When you click OK, the DVD will be “analyzed”–this process will last for 1-3 minutes, then DVD Shrink will “suggest” a level of compression.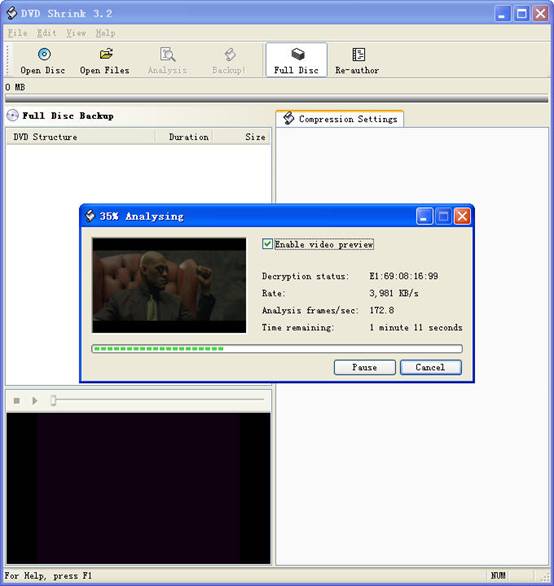
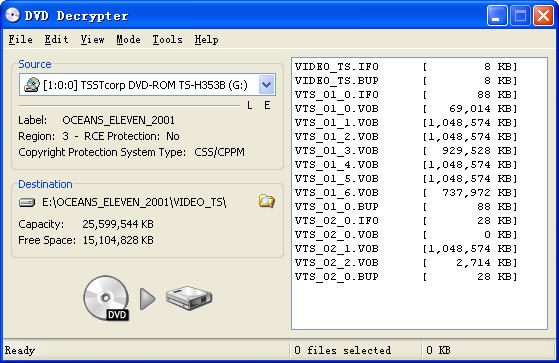
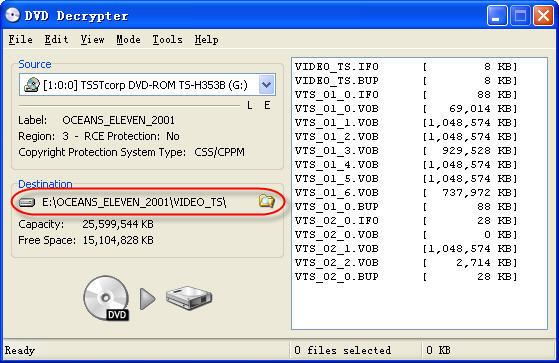
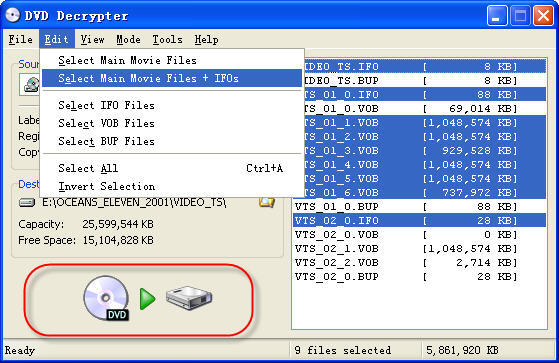
If you receive an error while trying to rip the DVD (like the one shown in the screenshot above), you will need to use another program such as DVD Decrypter to copy the DVD files off of the disc on to your hard drive. You need to minus the copy protections first. Click here to read how to use DVD decypher to minus the copy protections of DVD.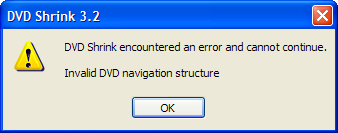
Step 3. Adjust compression for individual Titles (optional).
DVD Shrink will automatically select the highest possible quality settings that will fit on your disc. You could accept the settings that DVD Shrink chooses. You can also increase the quality of the main movie file by reducing or eliminating other video and audio files on the DVD.
Many modern DVDs will contain bonus footage, trailers, multiple surround sound modes, and other settings that one can reduce or eliminate to improve the quality of the main movie feature.
The main movie quality setting is reported to the left of a slider bar in the top right of the screen. In the screenshot below we see that the default setting requires that the main movie be compressed to 48.2% of its original level to fit on the disc. You can increase this percentage to improve the final quality of the backed-up DVD. But the output file will be larger.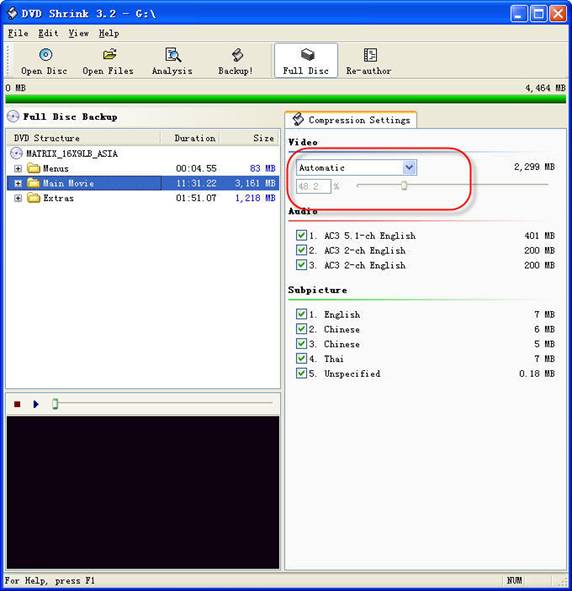
The way in which one goes about improving the quality of the main movie will be different depending on your specific needs. For example, when “Dolby Digital” and “DTS” 5.1 audio tracks are available, you can remove “DTS” (to save hundreds of megabytes), you can also choose to preserve “DTS” and reduce or eliminate other items from the DVD.
Some of the settings I made to this particular DVD were:
--Removed “5.1-ch French” audio track (went from 48.2% to 55.4% compression for main movie).
--Replaced certain Titles with “Still Image” (keep reading for more on this).
To improve the quality of the main movie, you'll need to reduce or eliminate other DVD features, each called a “Title” in DVD Shrink. Click the “plus sign” next to “Extras” in the menu to view the other titles.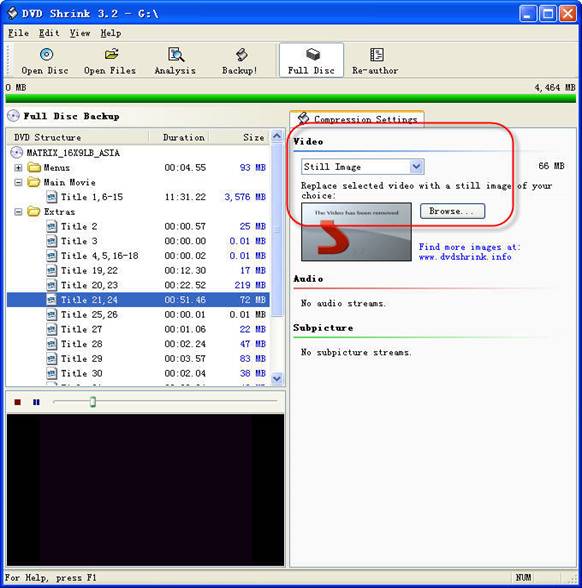
The Title I've selected below was 72MB. In this case the video was a “behind the scenes” feature that I did not wish to keep. Since one cannot completely remove any of the “Titles,” the next best thing is to replace them with a still image. In order to do this, select the title you want to replace, and choose “Still Image” from the drop-down menu in the top right. In this case the file went from 72MB to 66MB. The still image is configurable, simply drop an image of your own into the aptly named Still Images directory found under Program Files > DVD Shrink.
Step 4, Burn the re-encoded files to disc.
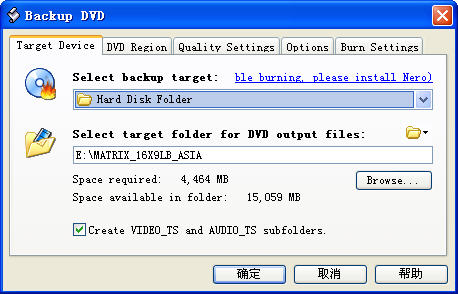
Click “Backup DVD” and Now select the folder where your temporary files will be saved. DVD Shrink needs to save a bunch of files on your computer (that actually compose your movie) so that it can burn that movie back onto another DVD. This is why you had to clear 5 gigs of space on your hard drive. Once the DVD backup has been burned, you can go ahead and delete these temporary files (the program does not do this itself).
You may as well select “Region Free” (default) under the DVD Region tab.
on the Burn Settings tab make sure “Maximum” burn speed is selected in the drop-down menu.
Once you have the settings the way you like them, begin the burn process. You'll see the “Encoding” happening first. There is a video preview that will show you where you are, but I believe that the encoding process goes slower with this setting enabled.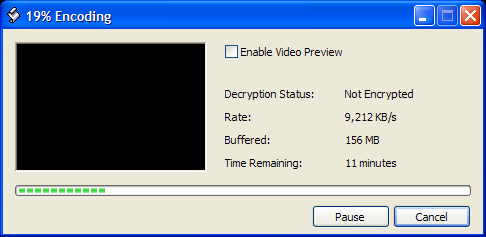
Once the files have been copied to your hard drive, your original DVD movie will eject from your computer.
You will also have a pop up asking you to put a blank DVD into the DVD burning drive of your computer that you previously selected.
Exchange the original DVD movie for a blank, burnable DVD. Push the blank DVD into the drive. DVD Shrink will begin burning the new DVD automatically in a few seconds. Now you will get a pop up that shows the progress while the program burns your new DVD movie. Once the new DVD has been burned, you will get a window that tells you that it's done. Click OK, close the program, and take your new DVD movie backup. All Done!
Note: DVD Shrink is only for PC users. If you are a Mac user, Please download DVD copy for Mac .
Part1. How to watch PDF or electronic book on iPod Touch/Nano/Classic/Video
iPod cannot directly display PDF files, you have to convert your PDF file or electronic book to *.txt format, and make sure the file size is smaller than 4KB, and then copy the *txt file to the “Note” folder of your iPod. Here are the detailed steps:
1. Enable your iPod as a portable hard drive, plug in your iPod to computer and run iTunes, in the summary tab, check the option named “enable iPod disk mode”
2. Download and install iGadget, it can convert and cut your files to 4kb .txt files. Here is the download link: http://www.youtubetoipod.biz/software/igadget.html.
3. Connect your iPod to computer, open “My Computer”, open the iPod drive (the new drive with your iPod name), and copy the txt file to the “Note” folder, done. Then you can read the text file on iPod note.
Part2. How to rip DVD and convert video to iPod Touch/Nano/Classic/Video
iPod can only play MP4 and H.264 video, but DVD movie is MPEG-2 video and CSS protected, so you need an application to rip DVD and convert video to MP4 video, and then sync it to iPod via iTunes. I strongly recommend Aiseesoft DVD to iPod Suite; it can rip protected DVD and convert limewire, youtube video, AVI, MPEG, WMV, MOV, FLV, XviD video to iPod. Also, I always use the iPod Movie Converter embedded in it to transfer video, and from my tests, it fully support all series of iPod including iPod Touch/Nano/Classic/Video. A really cool application.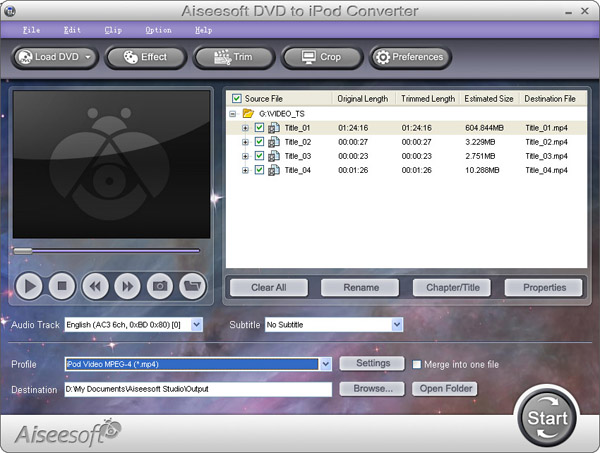
Here is its official download link:
http://www.aiseesoft.com/dvd-to-ipod-suite.html
Here is the official step by step guide:
http://www.aiseesoft.com/article/dvd-to-ipod-converter.html
If you are Mac user, you can use this DVD Ripper for Mac to rip DVD to iPod:
http://www.aiseesoft.com/dvd-ripper-for-mac.html
Part3. How to watch iPod Video on large screen TV
Set up your iPod video options. On your iPod choose Videos -> Video Settings from the main menu. You will see three options: TV Out, TV Signal and Widescreen. Select the “TV Out” option.
Get your A/V cable. If you don't have an eighth-inch-to-RCA cable, you can pick one up on eBay for five or six bucks shipped. Search for "camcorder A/V cable." Remember, you want a three-plug yellow/red/white RCA connection at one end and a three-banded eighth-inch (3.5mm) A/V plug at the other.

1. Plug the red RCA plug into your TV's yellow RCA jack.
2. Plug the yellow RCA plug into your TV's white RCA jack.
3. Plug the white RCA plug into your TV's red RCA jack.
After making these connections, you're physically ready to begin playback.
Part4. How to download youtube video to iPod for free
iPod can play only MP4 and H.264 video, youtube video is stream video (.flv), so you need special software to capture the stream video to MP4 video, and then sync it to your iPod via iTunes. Here’re two ways to do that for free:
With free online flv converter such as http://vixy.net when you find your favorite youtube video, just copy the video URL (like this format http://www.youtube.com/watch?v=sdUUx5FdySs ) to the input box, choose the output format as iPod video, and then click start. When the conversion finished, you will get the MP4 video download link, just download and sync it to your iPod.
With Firefox + videodownloader, if you’re using Firefox browser, just install a plug-in named videodownloader, and then you will see a small icon in the bottom right, when you watch youtube video, double click it, and then you will get the flv download link. And then convert the flv video to MP4 video with Aiseesoft DVD to iPod Suite, done.
Free Trial: Download Aiseesoft DVD to iPod Suite
Next part: How to download podcast to iPod and copy music between iPods ?