2011年3月31日星期四

How to convert HD video to MP4/YouTube/MPEG video

Maybe some people will ask: what is HD video and why it can be widely used?
Answer:
High-definition video or HD video refers to any video system of higher resolution than standard-definition (SD) video, and most commonly involves display resolutions of 1280×720 pixels (720p) or 1920×1080 pixels (1080i/1080p).
Nowdays, HD is becoming more and more popular as the following reasons:
1.HD DVDS, together with equipment to play and record them, are available now, stimulating the public appetite for HD.
2.PC displays with HD quality potential are becoming widely used, which will acclimatise the public to HD.
3.Large flat LCD screen with HD resolution are becoming readily available at prices which the public seems prepares to pay, providing the means to view HD.

While, HD video also has some inconvenience to use, such as, we can’t edit them
in Windows Movie Maker or some other edit software; can’t put them into portable devices directly , like iPod, iPhone, Zune, Creative Zen and so on; can’t share videos with friends on youtube, myspace and other online video website. etc.

Here, I’ll introduce a wonferful tool to solve this problem.
Aiseesoft HD Converter has three uses:
Convert HD video to general video;
Convert general video to HD video;
Convert among HD videos.

So with it, you can enjoy HD video at will.

The following is a simple guide for you:
Step 0: Download, install and run Aiseesoft HD Video Converter.
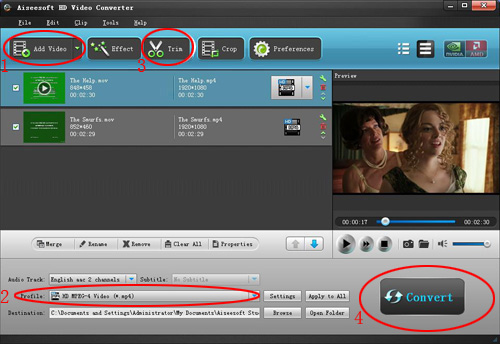
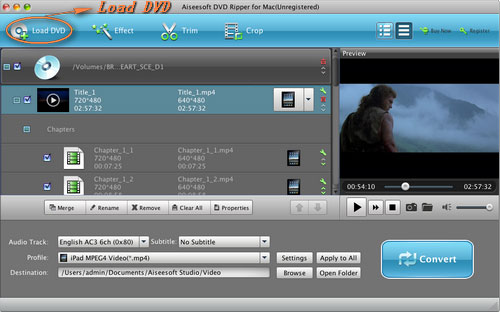
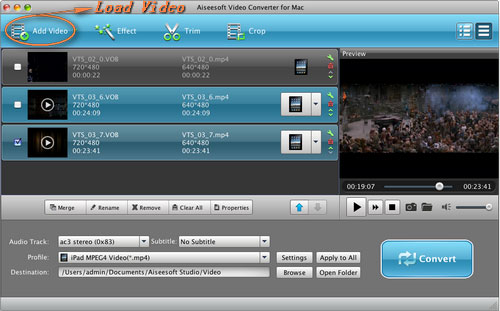
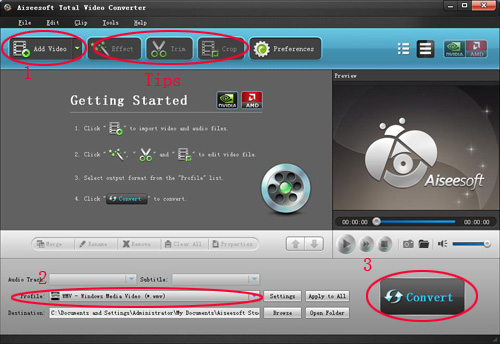


Step 1: Load Video
Click “Add File” to load the video that you want
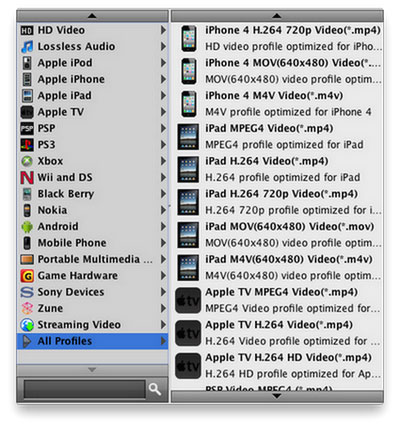
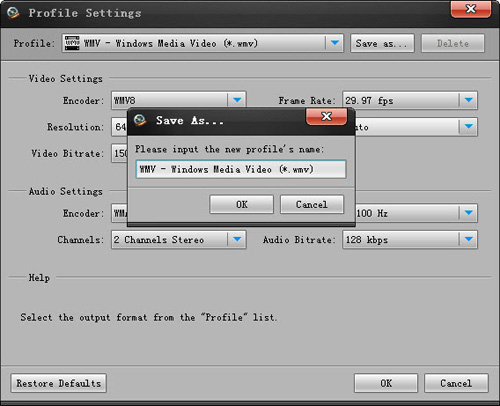
Step 2: Choose Your Output Profile and Settings
From “Profile” drop-down list you can choose your output profile according to your need.
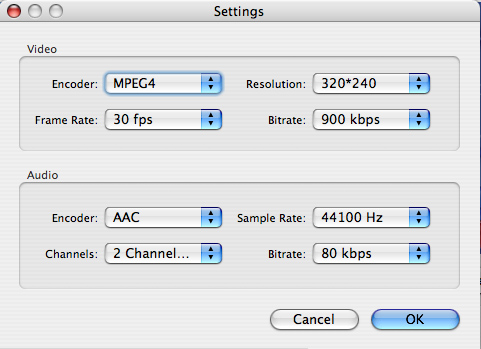
You can also click “setteing”adjust the settings of your output video, such as “video/audio encoder”, “Video/audio Bitrate”, “Channels”, “Resolution” and so on..
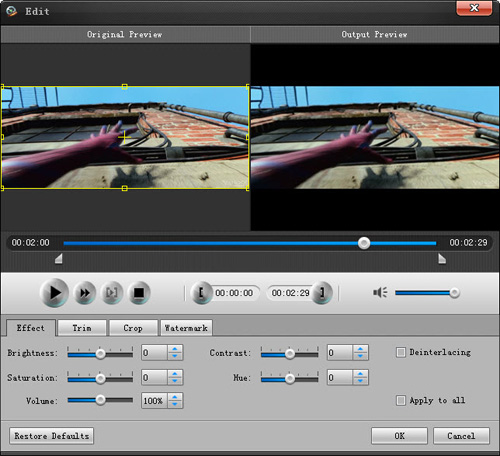
Step 3: Video Editing
This powerful MTS Converter allows you to do many video editings.
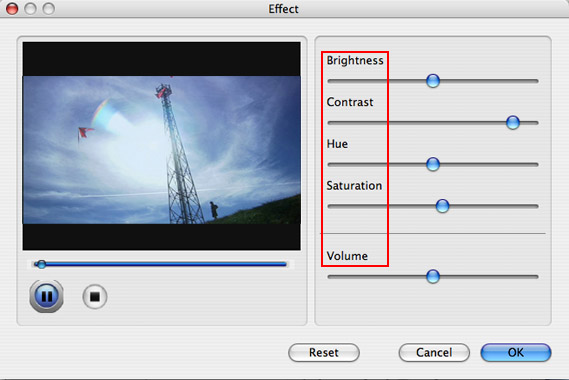
1. Click "Effect" to make special effect for your movie.
You can adjust the “Brightness”, “Contrast”, “Saturation” and also you can use “deinterlacing” to improve you output effect.
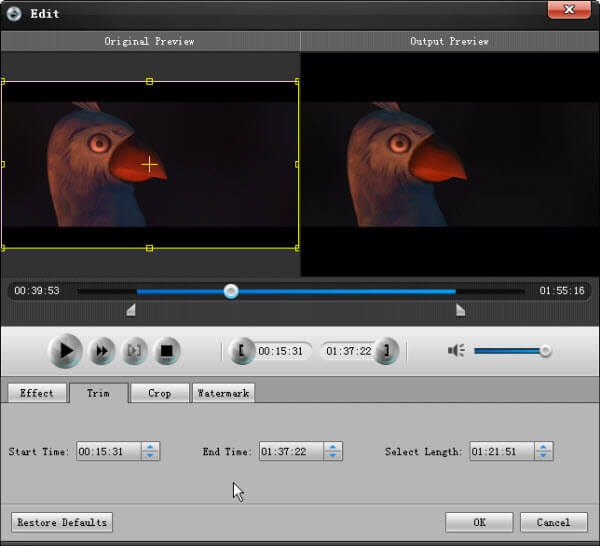
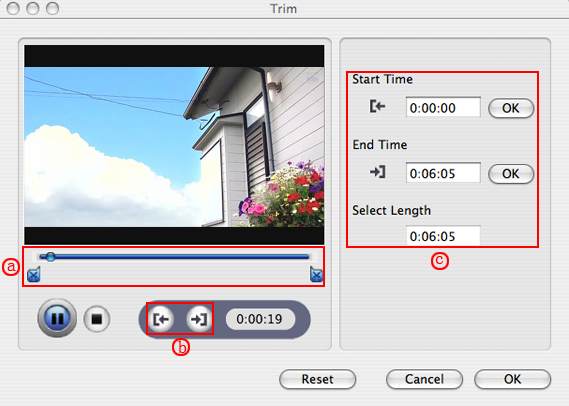
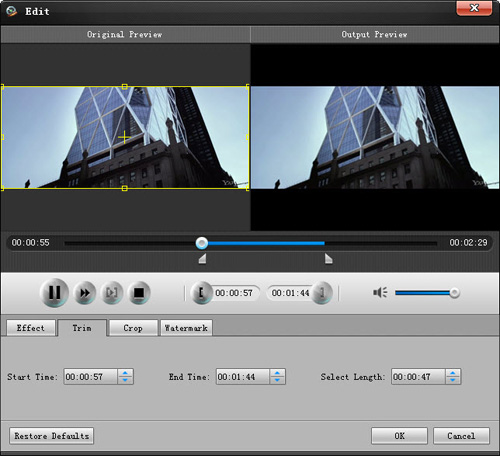
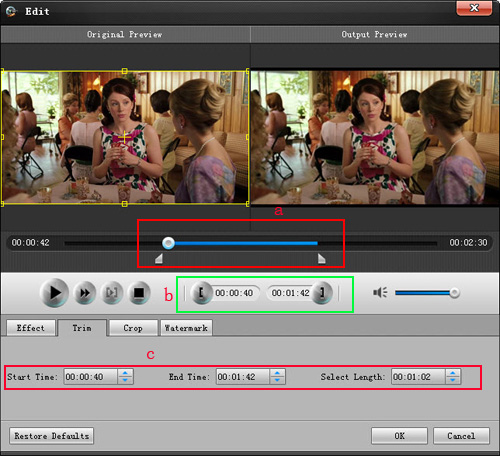


2. Trim:
“Trim” function allows you to pick up any part of your video to convert. You can just convert a part of your video that you want.
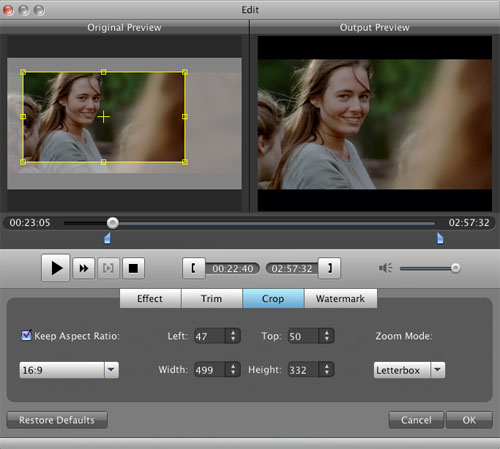
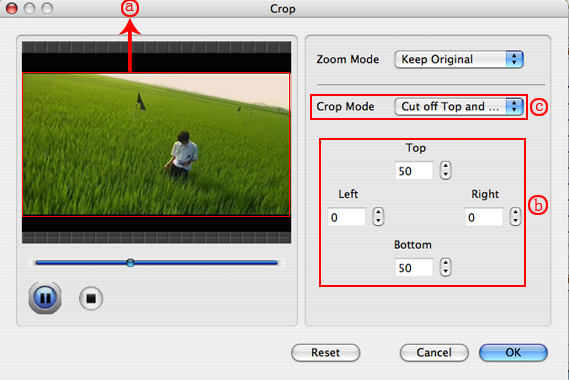
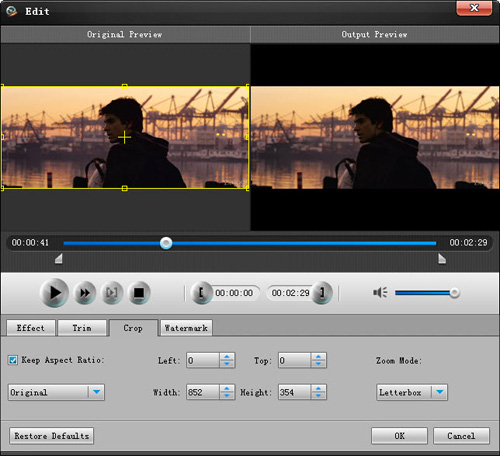
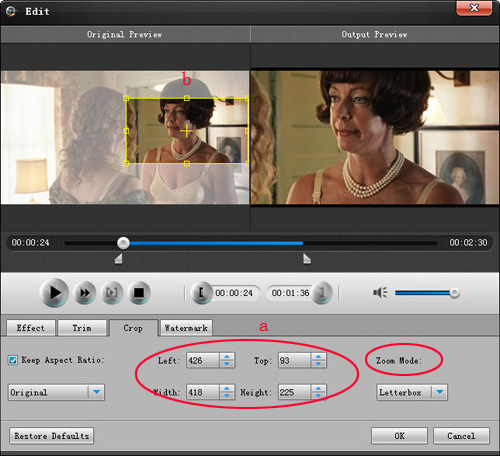


3: Crop:
Cut off the black edges of the original movie video and watch in full screen on your iPod using the "Crop" function.


Step 4: Conversion
After you have done all the steps above you can click “Start” button to start your conversion.

Tip 3:
Here i also recommend you guys a really nice TS Video Converter, which can convert TS file to all the popular standard video and to other HD video easily. It can also do many video editing works, such as trim, crop, merge and so on. It has super fast conversion speed and high output quality.
MTS Converter is also a really nice tool to convert MTS video file to enable you to edit in windows movie maker and other video editing software. And also allows you to upload your HD video to youtube.com to share with your friends. It can convert MTS file to iPod, iPhone, Zune, PSP, Creative Zen, Xbox video.

2011年3月27日星期日

How to Put DVD/Video on iPod, PSP, Computer, Zune, Xbox (Mac/Windows)

Many Mac users have iPod, PSP and other portable devices, but they can only enjoy songs and videos from iTunes or buy them from internet, because there is seldom nice Mac DVD and Video covnerter for iPod, PSP and other devices. Today I will introduce you an excellent DVD/Video converter for Mac: Aiseesoft DVD Converter for Mac It allows you to put your own DVDs and you own videos on your iPod, PSP, Mac Computer and other players on Mac.


This article aims to show you how to put your DVDs and videos on your iPod, PSP, Computer, Zune, Xbox and other players for Mac users.

Part 1. Convert DVD for Mac with Aiseesoft DVD Ripper for Mac

Step 1. Load DVD
Insert DVD into your DVD-ROM, run DVD Ripper for Mac, click “Load DVD”, find the DVD folder of the movie you want to add from your DVD-ROM, and Click “Open”.


Step 2. Set output format.
This best DVD ripper for Mac provides you output formats as many as you want. Just choose one from the drop down list “profile” according to your portable player.


If you are very professional with your player, you can also set your output parameter values such as Resolution, Frame Rate, Bitrate and Sample Rate and so on.


Tips:
1. Trim:

If you want to rip only a part of the DVD movie, please click “Trim” button and drag the “Start trim slider” to set the start time and “End trim slider” to set the end time. (a). You can also do that by clicking the “Start trim button” and “End trim button”(b). The third way you do that is set the exact Start/End time at the right of the pop-up window and click “OK”.


2. Crop:
If you want to remove the black edges or you want to rip a certain area of your video, please click the “Crop” button. You can do this either by drag the frame around the movie (a) or set the crop value: “Top, Left, Bottom, Right”.(b). Another way to do that is choose mode from “Crop Mode”(c).DVD Ripper for Mac also allows you to choose the output aspect ratio above the crop panel, “Keep Original, full screen, 16:9 and 4:3” are available.


3. Effect:
If you want to adjust the effect of your movie, please click the “Effect” button and a pop-up effect window will appear. It allows you to edit your movie’s effect including “Brightness, Contrast, Hue, Saturation and Volume”.

Click “Start” to begin your conversion.

Part 2. Convert videos for Mac with AiseesoftVideo Converter for Mac

Step 1. Choose “Video Converter for Mac” on the main interface.

Step 2. Add video
Click “Add File” to load your video that you want to put.
Step 3. Choose output profile and settings.
You can choose your output format from the drop down list and you can set the exact values of your output videos, such as Resolution, Frame Rate and so on.

You can do the video editing as the same way of convert DVDs.
After getting your satisfying video, then click “Start” button to start your conversion.

If you are a window user, Aiseesoft DVD Converter is your best choice.
It is the perfect combination of Aiseesoft DVD Ripper, Aiseesoft Total Video Converter and Aiseesoft iPod to Computer Transfer. With this powerful DVD Converter Suite, you can easily convert DVD and video to all the popular formats: MP4, H.264, AVI, MP3, WMV, WMA, FLV, MKV, MPEG-1, MPEG-2, 3GP, 3GPP, VOB, DivX, Mov, RM, RMVB, M4A, AAC, WAV, etc
And transfer your iPod songs and videos to your computer easily.


Aiseesoft iPhone to Computer Transfer

2011年3月15日星期二

How to convert DVD IFO to iPad 2?

The iPad 2 is suitable for enjoying the latest DVD movie. If you want to enjoy the seeing and hearing enjoyment brought by iPad 2, you need the help of DVD to iPad 2 Converter. Aiseesoft DVD to iPad 2 Converter is powerful DVD IFO to iPad 2 Ripper to help you convert any DVD and DVD IFO files.

Step 1: Load DVD IFO

First, you need to download our DVD to iPad 2 Converter and install it. Then you can insert DVD disc to DVD-Rom and click the "Load DVD" button. Choose the DVD from DEVICE, and open the VIDEO_TS folder to find IFO files.


Step 2: Choose audio track and subtitle

If the DVD movie possesses several audio tracks and subtitles, this DVD to iPad 2 Converter will list all of them and enables you to choose your preferred ones.

Step 3: Edit video effect

Aiseesoft DVD to iPad 2 Converter provides you with powerful video editing functions. After you inputting the DVD IFO, you are able to edit the video effect. For example, you can trim video length, crop video playing area, watermark video, modify video playing effect, etc.


Step 4: Choose iPad 2 profile

Click the "Profile" option and you will find this DVD IFO to iPad 2 Converter provides you with several profiles. You can choose any output format as you like.

Step 5: Convert DVD IFO to iPad 2

Click the "Convert" button to start converting DVD IFO to iPad 2.

2011年3月11日星期五

Top Five DVD to WMV Converters Reviews

WMV is a really popular video format, may video player can play .wmv video, such as GPhone, BlackBerry Storm, BlackBerry Bold, Palm Pre, Zune, Zune 2, PSP, PS3, Xbox 360 and so on. It is so popular, so what is wmv format, and how we can convert DVD and other video format to wmv format?

What is WMV video?
Developed and controlled by Microsoft, WMV stands for Widows Media Video. It is a generic name of Microsoft's video encoding solutions and doesn't necessarily define the technology what it uses.

Why we need to convert DVD to WMV?
Two reasons for this question. First, when we want to watch DVD movies on our portable video players and cell phones, we need to convert DVD to WMV. Second, when we try to put our DVD movies to windows movie maker to edit, we need to convert DVD to WMV.

What are the top DVD to WMV Converters on the market?
Top 1:
Aiseesoft DVD to WMV Converter.


Reviews:
Super fast conversion speed and incomparable output quality with a nice interface. Besides the great performance on conversion, the advantage of video editing function is really obvious. And it's price is reasonable.

Function:
Convert DVD to WMV, WMA, MP3 format.
Works perfectly with Zune, Gphone, Blackberry Strom, Blackberry Bold, Palm Pre, Xbox 360, PSP......
Choose subtitles and audio tracks.
Trim output video
Crop output video
Adjust the effect of the output video
Snapshot

Top 2:
4Videosoft DVD to WMV Converter

Reviews:
Conciseness of the interface with powerful conversion quality and outstanding speed. Also has video editing functions, trim, crop, merge and so on.

Function:
Convert DVD to WMV
Choose subtitles and audio tracks.
Trim, crop, merge output video
Adjust the effect of the output video
Save picture of the video

Top 3:
Cucusoft Ultimate DVD Converter

Reviews:
Powerful conversion function and fast speed. The only editing function is crop and also the interface is unconspicuous and a little wooden. The price is a little expensive.

Function:
Convert DVD to WMV
Choose subtitle and audio track
Crop output video


Top 4:
Aiseesoft DVD to WMV Converter for Mac


Reviews:
It is a really powerful Mac DVD to WMV converter. Outstanding conversion quality and speed, powerful video editing function with a gentle interface makes it the top 4 DVD to WMV Converter.

Function:
Convert DVD to WMV on Mac.
Support all devices
Trim, Crop, Merge output video
Adjust the Effect of the output video
Do snapshot

Top5.
Aiseesoft DVD Converter Suite

Reviews:
It easily convert DVD and video to all the popular formats, extract audio from DVD movie or video file and transfer songs and video from iPod/iPhone to PC.

Function:
Convert DVD and any video/audio to the various video/audio formats
Support almost all popular portable players
Transfer songs and video from iPod/iPhone to PC
Easy and powerful editing function (Merge, Trim, Crop)
Set video effect

2011年3月9日星期三

How to Copy DVD, Rip DVD, Convert Video on Mac

Many friends want to share their home-make DVDs and their DVD movies with others and also they always feel difficult to do that. Today I will share you a really easy way to Copy DVD to another DVD disc, DVD image ISO, or a DVD folder. Also I will also introduce you how to rip DVD and convert videos on Mac.

Part 1: How to copy a DVD to another DVD disc/DVD image ISO/DVD folder on Mac
Step 1: DVD Copy for Mac.
To copy a DVD on Mac, you need a DVD Copy for Mac to help you. Aiseesoft DVD Copy for Mac is a good choice.


Step 2: Load Your Source
This excellent DVD copy for Mac allows you to load DVD folder and DVD image ISO.

Step 3: Choose Output Info
1. “Full Disc” or “Main Movie”
This DVD copy for Mac enables you to copy the full disc and also the main movie according to your need.

2. “Audio”, “Subtitle” and “Volume” name
You can choose your output audio from the “Audio” drop-down list, such as “all audio”/ “None”/ or some audio the DVD provide.

Subtitle is always an important thing, you can choose your output subtitle in “Subtitle” drop-down list.

You can also name your output volume's name

Step 4: Choose Your Target
You can copy your DVD to another DVD disc, DVD folder or DVD image ISO.

Tips:
1. You can also choose to copy the menus or not.
2. All the info you choose will be dispalyed on the “Info Box”.

Part 2: How to rip DVD to video formats on Mac

Step 1: Download Aiseesoft DVD Ripper for Mac

Step 2. Load DVD
Insert DVD into your DVD-ROM, run DVD Ripper for Mac, click “Load DVD”, find the DVD folder of the movie you want to add from your DVD-ROM, and Click “Open”.


Step 3. Set output format.
This best DVD ripper for Mac provides you output formats as many as you want. Just choose one from the drop down list “profile” according to your portable player.

Step 4: Conversion
You can just Click “Start” to begin your conversion.

Part 3: How to Convert Video files on Mac

Step 1: Download Aiseesoft Video Converter for Mac


Step 2: Load video
Easily click “Add File” to load your video that you want to convert.

Step 3: Choose output profile and settings
At the bottom of the interface there are a drop-download list named “profile”. You can choose your output format here.

Tips:
1. Trim
If you want to pick up a part of the video to convert, please click “Trim” button and drag the “Start trim slider” to set the start time and “End trim slider” to set the end time. (a) You can also do that by clicking the “Start trim button” and “End trim button” (b). The third way you do that is set the exact Start/End time at the right of the pop-up window and click “OK”.(c)


2. Crop
If you want to remove the black edges or you want to convert a certain area of your video, please click the “Crop” button. You can do this either by drag the frame around the movie (a) or set the crop value: “Top, Left, Bottom, Right”.(b). Another way to do that is choose models from “Crop Mode”(c).
Aiseesoft Video Converter for Mac also allows you to chose the output aspect ratio above the crop pane, “Keep Original, full screen, 16:9 and 4:3” are available.


3. Effect
If you want to adjust the effect of your movie, please click the “Effect” button and a pop-up effect window will appear. It allows you to edit your movie’s effect including “Brightness, Contrast, Hue, Saturation and Volume”.


Aiseesoft
iPhone to Computer Transfer

2011年3月4日星期五

How to convert video files to MP4/3GP/WMV/FLV and other video formats

I am not very good at digital stuff and I don't know exactly what the video format is, such as mp4, wmv, avi, and so on. I only know my iPod accepts mp4 video, my windows movie make supports wmv and if you want to upload your videos to youtube.com you have to make it into flv I think. And if you have a Camcorder video I think not many player can play it so just convert them.

You know I can easily manage those video format because of Aiseesoft Video Converter It allows you to convert videos to any video format you want(including HD video).

Here I will share with you how to use it:

Step 1: Load Video
You can load your videos into the converter by clicking “Add File”


Step 2: Choose output info
This converter provides you many output profiles for you to choose, you can choose your output profiles according to your need. And also you can just choose a certain video format.

You can also adjust the settings of your output profiles. You can even save a certain settings as your own output settings.


Step 3: Conversion
Click “Start” button to begin your conversion and few mins later you can get your video.

Tips: How to effect, trim and crop the video to improve your output video quality.
After your Load your video you can click “Effect” button to access the effect panel

1: Effect
Adjust the video effect as you want: Brightness, Contrast, Saturation and Deinterlacing.


2: Trim
Clip your video, pick up any part of your video to convert.
You have 3 ways to do trim:

1.Dragging the slider

2.Controlling the “Trim From” and “Trim To” button

3.Setting the Start and End time


3: Crop
Adjust video size, Cut off the black edge of your video to let you enjoy your movie in full screen by click the 'Crop' button
You have 2 ways to do crop:

1.Move your mouse cursor onto one of the eight small adjustment boxes on the cropping frame and drag the crop frame to crop the video such as cutting off top and bottom black bar. The cropped result will be shown on the Output Preview at the same time

2.Type the value directly or set the value in "Left", "Right" and "Cropped area size" area to set the position of the cropping frame.


You can also select the aspect ratio from the Zoom Mode drop-down list. There are 4 choices for you: Full Screen, 16:9, 4:3 and Keep Original.

After you convert your videos you can put your video to iPod, Windows Movie Maker, youtube.com, and other player without any problem.